Pages

Saturday, December 31, 2016

2016 Finished Quilts - A Civil War Tribute - #24

Sorry about being out of order for the quilts I finished this year.  But, as I give them away, or in this instance, sell a quilt, I took some pictures (the best that I could at the time) so I would have some record of them in my blog and my quilt notebook.  As I get them quilts done this year, I have numbered them, and it has helped me keep better track of what I have done and accomplished.  I wish I had started a system like this when I first started making quilts.

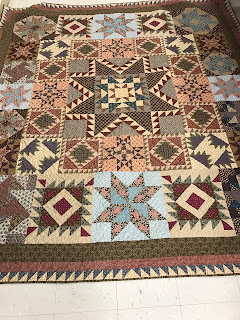
This quilt was called "A Civil War Tribute".  This was one of the the biggest quilts I have worked on, one of the most complicated quilts I have had the privilege of being a part of, and one of the most difficult quilt patterns I have ever followed.  I have found the bigger the quilt, the worse the pattern is, and somehow harder to get to come out square.

I confess, that I did choose to make this quilt to the original pattern from the 1800's and in order to get the blocks to come out to the correct size, the seams were 3/8's inch, and 7/16's inch.

You can read all the posts that I wrote about it here, if you are interested in the progress of me working on the blocks.

While at a trade show with my husband, I was spending some down time, hand stitching the binding on this quilt.  Remember it is about 102" X 112', so it was a rather large quilt for hand stitching the binding.  It was taking a lot of the down time (in between customers) to get this one bound.  Another vendor's wife was admiring the quilt, and telling her husband she would give anything to have a quilt like that for their bed.  He came over to ask how much a quilt like that would cost, and I mentioned to him the cost of materials and the amount of time one spends in making a quilt.  He didn't blink an eye, stating that he hadn't gotten anything for his wife for Christmas, and felt this would be perfect since she like it so well.  Sold!

Here is the finished quilt.


A close up view of a corner showing the pieced border and binding.


And lastly a picture of the backing and the quilting done by my long arm quilter.


I'm glad I sold this one, as I didn't like it as much once finished as I did when I signed up for the BOM.  I am so glad someone else will be enjoying it on their bed.  Warms my heart.


Size:102" X 112"
Fabric Lines Used:  Civil War Tribute Collection by Judie Rothermel
Civil War Reproduction fabric from Marcus Fabrics
Pattern: Civil War Tribute 
Designer:  Judie Rothermel
Long Arm Quilter:  Carol Logan Nelson
Year Began: 01/2010
Year Completed: 12/2016


Warmest...

Thursday, December 29, 2016

2016 Finished Quilts - Thimbleberries Log Cabin - Quilt 17

My last post of 2016 finished quilts was at number 12.  I finished 25 quilts this year, either by completing UFO's, working on past BOM's, and pairing completed tops with batting and backing, and then getting them all off to the long arm quilter.

Unfortunately, I have not been able to get any decent pictures, because here in the Pacific Northwest, we have overcast, wet ground, and either rain, mist, or snow, making it impossible to take any pictures.  My house is not big enough either to take full, nice pictures.

But I have either given away or sold some quilts, so I took the best pictures of the finished quilts that I could given the circumstances.  So some of the finished quilts will be out of order in posting until I can get out this spring to get decent pictures.

This was a Christmas present for my neighbor.  I have know her for over 10 years, and have known her through her children growing up, a divorce, and now her upcoming retirement as a nurse.  She will be selling her house and moving back to Montana to live when she retires.  She has bought some property up there and plans on building a new house.

I came up with the idea to gift her a quilt, one reason to use in her new house, and two, to remember us as neighbors into her new life.

I picked what I thought was appropriate for a house in Montana, I thought of a log cabin pattern quilt.  I finished this one in a group of 4 quilts during the month of July this year.  I began working on it back in May, you can see that part here.

This quilt kit was a part of a annual club for Lynette Jensen's Thimbleberries.  It was called "Anniversary Club" back in 2008.  It was a project for the month of October 2008.  This club consisted not a block a month, but a complete quilt every other month for two years.  There were 11 complete quilt kits in the program, and I have completed 3 of the 12 projects.  I finished # 3 last week called Star and Chain, which I posted about a couple of days ago.


This is a picture of the folded log cabin.  It consisted dark colors, constructing with light beige background fabrics.


This is a full picture of the completed quilt, on my kitchen floor.  Again, sorry for the poor picture, as the weather is cranky here in the Pacific Northwest.  


Close up of a block in the finished quilt.


Picture of the backing and binding of the finished quilt.


When I gifted it to her, she opened it and I told her it was for her new house in Montana and to help her remember us when she leaves, she broke down and cried.  She was so touched in receiving a quilt from us.  She said it would be perfect, as these were going to be the colors for her new house.  Such a nice feeling to give and the receiver be appreciative!


Size: 64" x 80"
Fabric Lines Used:  Kit using Thimbleberries Fabrics
Browns and Beiges
Pattern: Log Cabin
Designer:  Lynette Jensen
Long Arm Quilter:  Carol Logan Nelson
Year Began: 10/2008
Year Completed: 09/2016

Warmest...

Tuesday, December 27, 2016

Star and Chain Quilt

I picked out a quilt that was a part of a past quilt club.  It was a Thimbleberries club back in 2008.  The club consisted of 11 projects that were complete quilt kits shipped every other month.  This quilt kit was for the month of June 2008.

This quilt is called Star and Chain, and the pattern can be found in Lynette Jensen's book, "In Celebration of Quilting".


There was a lot of repetitive cutting of pieces.  It was important to keep them in order, as I found out later, getting one strip out of place, messed up the top and bottom strip where this one was attached to in the quilt pattern. 


In order to make the outer part of each block, I needed to make these strips, but then I needed to make  the same amount in the opposite direction to later sew together to make the outer star point.


This is the pile of corners I cut off of the above strips,  I have a ziploc bag full of these half-square triangles, that I will maybe figure out something at a later date.  One thing about the Thimbleberries projects that come in kits, there is always, and I mean always an excess of fabric.  I have a bin full of leftover fabric from the many projects that I have made using her lines of fabric over the years.   I already made a mystery quilt a couple of years ago, king size, using nothing but scraps.  


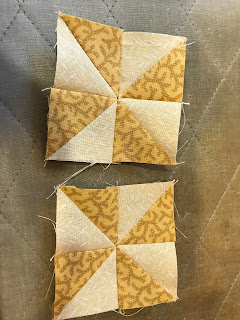
I made a couple of pinwheel blocks with the above scraps, but they didn't go together as well as I would like, as when you are cutting off corners, the pieces are not as precise as they would be if you were cutting them from a piece of fabric.  I will figure something out eventually.  


These pictures show the center star, using some flying geese blocks, and putting it together  in a nine patch block.  The strip below the star is the mirror image strip blocks that I made in the pictures above.  


You can see in this picture, that placement of the different colored strips is critical in order to have the  same colored strips surround the same colored blocks.


Here is the completed top, laying on my kitchen floor.  Not the best picture, but the weather is not cooperating this time of the year.


I will get it off to the long arm quilter after the first of the year, and will be the first finished quilt for 2017!

Warmest...

Monday, December 26, 2016

En Provence Mystery Quilt Part 5

It's that time again, another part of the mystery quilt came out on Friday, and I was able to work on it this weekend and I was able to complete part 5.

It was quite possible that many participants would not be able to get a big amount of work done, so she released a short and sweet part this week.

I ordered her new Essential Triangle Tool, that helps in making all kinds of blocks, including half-square triangles, quarter-square triangles, flying geese, and others.


I paired up a light piece of fabric and a dark purple piece of fabric to set up to use the new tool.  Using this tool saves fabric, and makes perfect blocks.


This is a set of part 5, which is a half-square triangle block.  Simple and easy.


I had most of Saturday free, so I cut out the different lights and dark purple, and then spent time getting them sewn up.  


So there you go, step 5 completed, now onto other projects while waiting for the next part.  If you are interested, it is still not to late to get all the parts to date and get involved and participate in this mystery quilt.  You can click on this link and find out all the information (p.s.  it is free), http://quiltville.blogspot.com/2016/12/mystery-monday-link-up-part-5.html.

Warmest...

Monday, December 19, 2016

En Provence Mystery Quilt Part 4

We are proceeding along quite well with the mystery quilt.  Part four was the same as part two, only using different colors.  


I managed to get part 4 done this weekend, and now I am caught up on all the parts.  Below is a sample of a group of 20 for each part.


I will be working on a few UFO's this week while waiting for the next clue to come out this Friday. 

If you are interested in participating or want any information on this mystery quilt, please click on this link  http://quiltville.blogspot.com/2016/12/mystery-monday-link-up-part-4.html.  

Warmest...


Wednesday, December 14, 2016

Little Wallet

I have used this pattern since it came out several years ago.  This is the only thing I carry, as I don't carry a purse.  I learned to to this when I traveled so much with my job.

Several people who see what I have done in downsizing my purse carrying wallet, have asked for some special orders.  Recently, I got an order for ten.  So, I went looking for my trusty pattern, and nope, nada, nothing.  I tore my sewing room apart looking for my pattern.  I remember putting it in a safe place a place I will never remember again (Ha! Ha!).  Now, it is off to the only store I remember seeing it for sale, and fortunately they had one, yes one, left.  


I went on a treasure hunt through my stash of fat quarters.  I needed two different prints for each little wallet, so I worked on finding sets of two matching prints.


Worked on getting them all cut out (see the paperwork in the background?  That's a whole 'nother story in my hectic life), and started sewing them together.


The wonder clips are a wonderful tool in working with these types of projects.  The best part for me is I will remove them before stitching that spot they are holding.  I am not so diligent in removing pins, and have broken more needles than I would like to admit.


Here is the first three I got done.  I change up the pattern a bit, by adding velcro for a closure instead of a snap, and I add my "Wren's Nest" label with a key ring.  I also add a birdie charm to each key ring as a symbol of the wren and my business.  I sew a button on the front of the flap to cover where the velcro is underneath.


When I get each one done, I package them in a clear envelope and slap a "Wren's Nest" label on each one.  All nicely done in a perfect little package.


Here they are all done and packaged up and ready to go to the customer.   Hope all the people that receive one will enjoy using them as much as I do.


Warmest...


Tuesday, December 13, 2016

En Provence Mystery Quilt Part 3

Well, it has been a slow week,  even though the knee surgery went well and recovery has been normal, I have had to rest it more than what I like my activity to be in my life.  But the good news is that I have been able to catch up on the Mystery Quilt, because I have lots of time to sew while I have my knee elevated.  It's a good thing that the surgery is on the left knee, and I sew with my right leg on the pedal.

Anyways, this is the next part of the mystery quilt.

We are starting to get into the colors of the quilt, and this part uses the dark purple and the light lavender.  We are making some more four patches, just like part 1, using just neutrals.

This is a sample of what I had in my stash and a few new fat quarters that I purchased recently.  Mostly because I didn't have enough variety to have the scrappy look that we are trying to accomplish with this mystery.


I am again bundling them in groups of 20, so I can more easily keep track of the amount needed for this part.


Here is what I have left to do today.  I have some time before I go back to the orthopedic doctor to get the stitches removed.


I am anxiously awaiting for part 4 which will be out this Friday, but in the mean time, if you are interested in getting the instructions can go this this link  http://quiltville.blogspot.com/2016/12/mystery-monday-link-up-part-3.html.


Warmest...

Monday, December 5, 2016

En Provence Mystery Quilt Part 2


I woke up Friday morning and true to Bonnie's word, she posted part 2 of the mystery Quilt.  Well, I went ahead and printed out the instructions, and gathered all the materials and took a picture. 


But, that is about as far I as I could go in working on this clue, because I had to be at the surgical center shortly after printing off the instructions.  I had endoscopic knee surgery, repairing a torn MCL and removing a bone spur that had broken off and floating around under my knee cap.


Flowers my son sent for a quick recovery.  I have had a quick recovery.  I spent 48 hours with my knee elevated (just like the instructions).  Today I have little to no pain.  


I am busy getting a few household items done this morning, but I squeezed in a practice run of two blocks to see if I understood the instructions.  I managed to only have to rip out once and now the final pieces come out to the correct size.  So, I feel confident, when I can spend more time sitting (I need to elevate the knee again this afternoon, as I don't want it to start to swell up) 

If you are interested and would like to participate in Bonnie Hunter's Mystery Quilt this year, click on the link below and it will take you to her blog post on Quiltville.


More on this and other projects later this week.

Warmest...

Thursday, December 1, 2016

En Provence Mystery Quilt Part 1


I woke up last Friday, finding part 1 of Bonnie Hunter's Mystery Quilt, En Provence.

I got the strips cut out of various neutrals.  Had a nice little stack to start with to get to the number of units needed for this part.


I did a sample block of the unit and measured to make sure it was coming out the correct size.  Perfect!


As always, to reduce bulk in these pieces, I pinned the seams.  I usually do this in all my block making, when I can, but Bonnie is really emphasizing this technique this year.  I imagine it is important to the rest of the quilts bulk.


I am stitching this on my vintage 401A, and using a 1/4" seam guide that can be screwed onto the base of the machine.  Makes a huge difference in getting an accurate seam.


After getting the little pile of cut strips all sewn up, I realized I needed to cut a lot more strips to make the amount needed for part 1.  These are batches of twenty, and I need about double that amount.


So off to the scrap bins I go, and found more neutrals to strip up and get sub divided into pair to make the four patches.   Here is the tub of pairs, ready to be grabbed up in a scrappy manner to finish the amount needed for Part 1.


I didn't give specifics on the size used or amount needed in this post, as it is only fair to link back to Bonnie's blog page where you can find out all the information if interested in joining, or seeing all the other people participating in this mystery quilt this year. You can click on the link below to see and get all the information.

http://quiltville.blogspot.com/2016/11/en-provence-mystery-monday-link-up-part.html


Clue two comes out tomorrow, but I will be having (finally) my knee surgery, so I will have to wait this weekend to work on the next part.

Warmest...

Wednesday, November 23, 2016

Binding Marathon

I have been on a binding marathon again, I had four quilts back from the long arm quilter the first of October.  AND, I just got back five more from the long arm quilter about a week ago.  

This quilt is the last of the four from last month.  I need a nice day (maybe next April?) to take pictures again of all the quilts (UFO's) that I have gotten completely done.  I will be working on the next five quilts over the holidays.  

This is a sneak peek close up of this quilt.  It is a a Thimbleberry club back in 2005.  


More about this quilt and the others coming soon.

Warmest...


Sunday, October 30, 2016

Quiltville"s Mystery Quilt 2016

Bonnie Hunter's new mystery quilt has started this year.  This will be the third year that I am going to participate.  


First off, Bonnie just released her latest book, Addicted to Scraps, and along with her book she created a new ruler and offered them as a package deal, and hinted she would be using her new ruler in this year's mystery.  So, I placed my order (sucker) and it came in the mail this week.  I also picked up a set of her playing cards.  A nice novelty to have around, since we all like to play cards.


As like prior years, Bonnie releases her theme name and the paint chip colors around Halloween.  This year's theme name is En Provence from when she went on a tour earlier this year.  You can click on the button I have on the right side of my blog and get all the details for this years mystery if interested.  The goal with the paint chips is to give you an idea of the colors that will be used in the quilt, and since she is all things scrappy it is suggested to pull from your current fabric stash.  I did not think that I would have any, much less enough, of these colors in my stash to follow her color suggestions this year.  But surprise, surprise, surprise, I did have all of what is pictured below in my stash.  I couldn't believe it!!!


The prior two years, I have not followed Bonnie's color suggestions, and used alternate colors (matching values) using Thimbleberries scrappy one year and just four Fig Tree Fabrics w/ a constant background last year.  I am looking forward to doing it this way this year.  Follow along with me over the next 8 weeks to see all the weekly clues, progress and the final reveal of the mystery quilt.

I usually wait until I get finished with a quilt to find a backing.  Sometimes years later.  But, this year while visiting an out of town quilt shop, I found this piece that was pre-cut and discounted.  I pick up 9 yards for under $75.  What a score.  it has all the colors of the paint chips, and I think will work perfect as a backing for this quilt.  It is from the Dowtown Abbey Collection.


I have gotten 8 more UFO quilts back from my long arm quilter, but the weather has been nasty here in the Pacific Northwest, so I haven't been able to get out and take some nice pictures of the finished quilts.  So far, I have 6 of them bound, and have 2 to finish.  I also have 5 quilts at the long arm quilter getting quilted, so will have lots to write about in the next few weeks if I can get pictures.

Warmest...

Thursday, October 13, 2016

Blog Update

I didn't realize how long it has been since I last posted on my blog.  I have been busy, with various things, but not anything specific or important enough (in my mind anyway) that would make an interesting post.

The weather has been dicey around here in the Pacific Northwest, so I haven't been able to take pictures of finished quilts like I would like.  But, I have gotten binding on four quilts, and will have to  make future posts at a later date.

I have also been working on some BOM's and custom orders for my etsy store.

This is a custom order for a bigger fleece blanket.  Usually I make these fleece blankets in smaller blankets for babies.  The customer saw me making a baby blanket using this fleece print, and wanted to know if i could make one bigger, I said this was the last piece and since the fleece print was "old school" design for this team, it would be difficult to find more to make a big one.  Well I was off across the state visiting a hole in the wall kind of quilt shop, and lo and behold they had this fleece print.  they had about 2 1/2 yards left, so I bought it and contacted the customer.  Of course, the customer was ecstatic and said yes to me making it for them.  It measures 5' X 6', which makes a nice couch throw.


I also have been working on the Vintage Sampler blocks, I got a little behind, I am just now woking on Block 5, which came in the mail last week.

Here is block 3

These are churn dash blocks.  This month they started adding the sashing pieces so when at the end, all the pieces will go together nicely.


This is block 3 fillers that go in and around the major blocks of each month's package.


This is block 4.

Two of the blocks are 12" square, the one on the left is called "Woven Star" and the one on the right is called "Star of Hope", and the filler block is some more Broken Dishes.


Fall is a very busy time of the year.  Just like spring there are so many things that need to be done outside and in all the garden  and flower beds.  Lots of clean up and dead head work that when done, make for ugly pictures.  But, I have wanted to make a pathway from the backyard sidewalk to my greenhouse.  I dug out the dirt and hauled in the filler and hauled in the flagstone to make this pathway.  It was really hard work, but very satisfying to get done.  I know it is a little crooked, but my herb barrels weren't placed perfectly either, so the pathway follows their setting.  I really don't care, I am stating that it is quaint and since it is my work, I will claim it in all it quirkiness!

My rescue dog photo bombed my picture!  


Warmest...


Monday, September 19, 2016

Simple Nine Patch

I pulled out another UFO last week, all the nine patches were put together, except the last month.  So, I finished them up and pieced them together.

This was a BOM, and the pattern was found in this book, Primitive Gatherings.  Had to buy the book to participate in the BOM.


This is a picture from the book showing the finished quilt.


There are several ways you can make a nine patch.  Many designers have come up with efficient and easier ways to make this block.  These women designers use a totally different technique than I had ever done, and the blocks came out better than if I had done it any other way.  


This is my top with the blocks sewn together.  It is made up of civil war reproduction prints and a tea stained muslin.   I just love the simplicity of this quilt.  I am excited to get this one done.


The only draw back of this quilt is I didn't want a square quilt, so I made it longer.  In doing so, it is now not wide enough, and obviously there is no scrap leftovers.  So, I have bought a muslin that is a pretty good match and I will have to tea stain it a bit to be a better match, and will use some of the civil war reproduction scraps from the quilt Civil War Tribute.  

Another work in progress in the queue.

Warmest...