Wednesday, May 31, 2017

Vintage Sampler Block 7

I had given a sneak peek at this block when I finished block 6.  

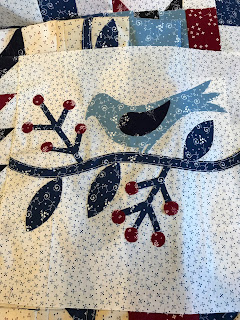
The three main blocks this time were the bird appliqué blocks.  Two blocks are mirrored alike images, and the third is a bird on a stick.  


This BOM, has filler blocks each month and so far, they have been put aside for assembly with the main blocks at a later date.  But beginning this month, we are beginning to combine the filler blocks to the main blocks.  This is one of the bird blocks with the filler blocks sewn on to it.  


I am glad I have all the blocks to complete this BOM program.  I worked on cutting out block 8 tonight.  It is three basket blocks, and one regular block.  I should have it done in a couple of evenings.

Warmest....

Monday, May 29, 2017

Before and After Wicker Loveseat

I have had this wicker love seat for about 10 years.  I originally bought it to do some staging in a house we were selling in Portland.  It moved with us to Salem, and has taken a beating sitting out on my back porch.

I will note that the weather is not all the fault of the demise of this love seat, the cats seemed to like using it as a scratch posts as well.


But it is still very sturdy, and I like how it fits in the place on the porch, so I pondered it awhile, and decided to do a little DIYing.

I bought some Sumbrella fabric and foam (on a side note, I cannot believe how much dense foam costs these days.  About $1.44 an inch.  So the new foam seat cost about $52.00!!!)  at Joann's store.  

I came home that night and began working on making the new seat cushion and three pillows.


I didn't take any other pictures during the process of getting it done. But it has a new coating of spray paint, new beach side print pillows, and a new seat.  

In all her glory, sitting in the evening sun, ready for another 10 years.  Fingers crossed!!!


Warmest...

Sunday, May 21, 2017

Vintage Sampler Block 6


It has been over seven months since I have written about this BOM.  I have gotten behind on BOM's in the past, but this one was none of my fault.  I have been so upset about this BOM with the quilt shop that sponsored it.  You couldn't participate or buy the complete BOM without going through a local quilt shop.  I signed up almost a year ago, and got the first five blocks with not problem.  Then a couple of months went by, and nothing.  I called, and they stated they would be getting it started again soon.  Another month went by, and then I asked to speak to the owner of the Quilt shop.  She told me they mis-calculated the ordering of the fabric for the number of participants, and they were working on getting more fabric to finish out the BOM.  They would be getting out the next block within the next week.  Well, she was good to her word, and I received the sixth block.  Then, again, one month, two months went by and nothing.  So, I called again, and asked to speak to the store manager.  Not in, and I left a message, not really expecting a return call.

But she called the next morning, and told me that the next block was due to go out in June.  June?  Why the wait?  She stated that they just got in the rest of the fabric and wanted to get the kits cut up.  I said that I wasn't too happy about stringing this out any more than it has already had been, and really didn't want to wait that long agin.  She then said that they sent out the sixth block at no charge as a way of apologizing for the mess up of this BOM.  I stated that I had been charged for the sixth block.  Then out of the blue, she asked if I would like to receive the rest of the blocks and the setting block all at once.  She should not charge me for block 7, and charge me for the remaining 5 blocks and send them out the next day.  I jumped on that offer so fast, as I wanted to get the remaining blocks now and know that I would be getting all the rest of the BOM without stringing it out any more than it has been so far.

So, I am back on track with this BOM, Vintage Sampler, and couldn't be happier.

Here is block 6:

It is really interesting how laying out a block just a little different, you get a completely different block.  This was the way I sewed the first block of two and it wasn't correct, so I had to take it apart and put it together the right way.


This is the right way, block 2.


As we are approaching the finish line of this quilt, it is beginning to require adding the sashing and building blocks to the main blocks.


Sashing added.


Building blocks and sashing building for future blocks.


This is a peek at block 7, it has three appliqué blocks and several joining of sashing and building blocks.   This block was one of the main reasons I chose to do this BOM.  My name is pronounced like the bird Wren with a hard E on the end.  Something like Rennie, Renny, (try rhyming with Jennie, or Jenny, only with a R)  Anyways, wren like birds alway attract me, and this quilt is no exception.  I also liked the shirting fabric that is being used as the background.


I am feeling very relieved, having all the rest of the BOM blocks and knowing I can get this one done sooner than later.

Friday, May 19, 2017

En Provence Mystery Quilt - 2017 Finishes #28

Yes, I finally got this quilt done!  It came back from the long arm quilter last week, and I got the binding on it within a couple of days.

This is a close up of that border that makes the points of the stars look like they are floating into the border.  Really a cool look.


I chose to do a the binding in the same print as the pink stars in the quilt.   I think it makes the quilt pop.


Again, the weather is not cooperating with me for picture taking, but here it is laid out on my CalKing sized bed.  See, I told you it was a big quilt!


This is a close up of the backing.  Remember, I found it at an obscure quilt shop, and felt it would work perfect, as the colors of this print are all in the front of the quilt.  The print is from the fabric line "Downton Abby" by Andover Fabrics.


Since this is being gifted, I had enough fabric of some of the scraps to make a couple of pillow cases. I like to make French seam pillowcases there are may free patterns out there on the web, especially on the All People Quilt site, where they are doing a 1 million pillowcase drive for different causes.  You can find out more here.


Here are the finished pair of pillowcases.  I made them for decoration to go with the quilt, and not to be actually used to sleep on, unless they choose to do so.


Warmest...


Size: 88" X 88"
Fabric Lines Used:  Scrap Stash 
Pattern: En Provence Mystery Quilt 2016
Designer:  Bonnie Hunter
Long Arm Quilter:  Carol Logan Nelson
Year Began: 11/2016
Year Completed: 04/2016


Wednesday, May 17, 2017

En Provence Mystery Quilt - Part 7


En Provence Mystery quilt of 2016, part 7, is the last part of this mystery quilt.  It included two separate blocks (several units of each) and the finishing instructions to complete the quilt.

First up are blocks that are the same block as part 6 only has different color placement.  This by the way is a Hour Glass Block, very easy to do.


The next set of blocks, in the instructions, were to be a 3 inch block of one print of yellow.  I felt that wouldn't be scrappy enough, so I decided to cut it into 4 equal pieces to make up the 3 inch block.  

This is the some of the parts, laid out to make the main block of this quilt.  As you can see the scrappy yellow blocks look really nice with the rest of the scrappy block.  This is a really large block, bigger than 12", and there are 16 of them in this quilt.


The next few pictures were taken, as I was working on piecing the quilt blocks and the sashing blocks to complete the top.

This first picture is of Woodstock from the Peanuts cartoon.  there is only one block of him in the whole quilt.  I thought it was too cute not to get a picture of it.


This is my bucket (the plastic bins you get when you stay in the hospital) that I use to hold all the parts as I finished them, and then pull them out to make the final blocks to sew together.


Here is the pile of completed block parts along with the sashing parts ready to be sewn all together.


This is just a picture of the overflow of parts from making them each week.  I made extra of each part, because I wanted to make sure I wouldn't have any scrappy prints of the same print get sewn next to each other.


This is the start of sewing the blocks and the sashing together.  The quilt is square, with 4 blocks across and 4 blocks down with sashing blocks in-between.

\

This is the best picture I could get this winter here in the Pacific Northwest, as it has been a very wet winter.   This is the finished top.  If you look really close at the top of the quilt, you will see a white "border".  This border is made from the left over pieces from part 1, 2 and 4.
.
Part 1
Part 2


Part 4


The first round of border has the 4 patch with a part 2 and a part 4 every two blocks, and then the final outside border is a round of 4 patch blocks.  It give the illusion of the pink and purple stars floating out into the border.  Really cool.  I'll try to get a better picture of the border when I finish the quilt.


Below is a close up the of the scrappy blocks, and yes as I look at the picture, I see a misplaces piece, but I am not going to change it, as it is such a busy pattern, I don't think anyone will see it once it is quilted.   There's probably more than this misplacement, but overall the quilt looks really pretty.  The picture does not do it justice.  


As it was laying on the bed, I called in my mom and asked her if she liked the finished look.  She of course liked it a lot, but purple is a color she really likes.  I told her that even though I think it came out prettier than I expected, it is not something I would ever use in my house.  Then we discussed a very close friend of hers that absolutely loved purple, if she would like receiving the quilt.  My mom, excitedly said yes, this quilt would be perfect for her, so we decided that when it got quilted, we would ship it off to her.  A happing for everyone all around.  

Hope to have finishing pictures soon.

Warmest...


Monday, May 15, 2017

2017 Quilt of Valor Stars - June Block - Ohio Star

I am moving right along in getting the monthly blocks done for the Quilt of Valor Stars program.  This is the block for June, the Ohio Star.  

Again, I made a block of colors each in opposite color placement.  Notice the background fabric this time, stars!  How cool is that, when making star blocks and using star white on white background.


Warmest...

Saturday, May 13, 2017

EN Provence Mystery Quilt - Part 6

I must have lost all track of time.  This mystery quilt was worked on back in the end of 2016.  I worked all the parts timely as they came out each week, but I didn't do a blog post on the the last two parts and the completion of the top.

So the next few posts will be all about the finishing of this quilt through completion.  My apologies, if  I happen to left you hanging waiting for the next parts and the finishing of this quilt.  HA! HA!  this was more for my enjoyment, imagining a following that really keeps track of what I do.

Anyways, this is really more for my record keeping and documentation of this quilt.


One of the reasons I may not have posted about this step is because it was very simple and limited.  The above picture is this part, and only a few were to be made.  So here it is in all it's glory.  

I am still struggling with the colors of this quilt.  As I stated in the beginning, I thought it would be a good idea to get out of my comfort zone, and make a quilt in colors I would not normally choose.  Hopefully as I start piecing this quilt it will come together and look better than I think it will at this point.

Stay tuned!  I promise to finish posting about this quilt until it is finished.

Warmest...

Friday, May 12, 2017

Laundry Mishap

Anyone out there have a front load washer and dryer, you know the kind that are all the rage, and claim to be so energy efficient?  Yeah, those awful machines.  I just had to have them back about 12 years ago.  And have disliked them from the first day I used them.  But, they were expensive and I felt they did the job, so I put up with them until a week or so ago.  I was washing bedding, doing my Mom's sheets first, using bleach like I alway do when washing bedding, and that load came out just fine.  Then I washed my Chocolate quilt (the one I have on my bed, as pictured in the first picture).

Well, my washer starts making some very strange, not heard before noises, and an error message comes up on the panel.  I think it is just that it got imbalanced, so I pull out a sopping wet quilt, and rearrange it in the tub, and try to start it again.  No go.  The drum won't spin, and water won't drain out of the drum.  So, I open the front of the washer, drain out all the water, and start the washer again.  
Still no go.  Do all the steps again, wring out the quilt by hand to see if that would work.  Not happening.  All it did was fill up with water again, and then just hummed when it should spin.  So, I pulled out the quilt again, wrung it out again, the best I could, and put it in the dryer.  It took 4 hours to dry.  I can't wring a quilt out as well as a washer I guess.

So, get it out of the dryer and put it on the bed, and what I saw took my breath away, and my heart dropped.  

Yep, you are seeing correctly, bleach spots, five of them in two areas of this quilt.  Not small ones either!!!!


This is the second area, but at least it hangs off the bed on side that can't be seen from the doorway.


This is a close up of the part above, and it is the worst spot of them all, as the bleach ate through the fabric, some of the batting around the stitching down to the backing.  Believe it or not, it didn't go through and discolor the backing.


This is how it looks as you walk into the room.  Not too bad at a distance.  Hubby says it give the quilt character and a good story.  He says it stays on the bed.  I say in my head, yeah, until I can get another big one made.


I will note, that I use bleach all the time in this washer, and never had trouble of it holding over to the next load, I think that the washer was going bad when I washed the sheets, and the quilt got the brunt of the disaster of the washer not working anymore.

There is some good news in all of this episode of disaster.  I was able to do away with the front load washer and dryer and replace them with brand new SpeedQueen top load (with an aggitater) washer and regular dryer.

I have not been disappointed since I have done the first load.


Warmest...