Showing posts with label Table topper. Show all posts

Wednesday, November 21, 2018

2018 Finishes - Sugar Pines - #51

This finish is another quilt from the Thimbleberries program called "You're Invited".  It was a kit for the month of July back in 2007.   I believe it is a table topper, but if I had given it more thought, I think it would have been a great Christmas tree skirt.


The piece measures 46" X 46", with four focus blocks that have an embroidered leafless tree in each block.  

I opted to do the embroidery on my domestic machine. using a simple zig-zag stitch.  Once it was quilted, it looked just as nice as if I had done it by hand.


This kit was done in darker Christmas colors and a border with a Christmas flower.


I the binding is done in red and the backing has all the colors of the front of the kit.


Warmest...


Size: 46" x 46"
Fabric Lines Used:  Thimbleberries 
Colors: Gold, Green, Red
Pattern:  Sugar Pines (Thimbleberries "You're Invited" 07/07)
Designer:  Lynette Jensen
Long Arm Quilter:  Carol Nelson
Year Began: 2007

Year Completed: 2018

Friday, November 16, 2018

2018 Finishes - Star Blossom - #49

I am working my way through the programs that I have kits from, and this is another one from the Thimbleberries program "You're Invited" for April 2007.  It is called "Star Blossom" and is a quilt / table topper.   This one would look nice on a table because of the way the five stars are laid out in the middle.


This has a fall look about it with the colors used in the top.


Just a close up of the star, and the other blocks.  I used a scrappy binding to use up the leftover fabric from the top.


I have used this backing on several of my Thimbleberries quilts, as it has the colors of most of Lynette's color palette, and it comes in a 108" width, making it an easy go to fabric for a lot of these quilt kits.  


Size: 42" x 42"
Fabric Lines Used:  Thimbleberries 
Colors:  Black Gold, red, Green
Pattern:  Star Blossom (Thimbleberries "You're Invited" 04/07)
Designer:  Lynette Jensen
Long Arm Quilter:  Carol Nelson
Year Began: 2007

Year Completed: 2018

Friday, November 9, 2018

2018 Finishes - Fresh As A Daisy - #47

Another square quilt / table topper from the Thimbleberries program "You're Invited".  This is called Fresh A Daisy for February 2007.  


This has nine blocks with each one appliquéd in the center of a daisy using blue and pink fabric.  I machined on the appliqué design using a blanket stitch on my domestic machine.  Each appliqué is done on the same background fabric, and then each block is framed with the same fabric from the fabric used as the petals or from the borders.


This is one of only a few quilts that I have done that have different fabrics for one border.  Gives a whole different look to a quilt.  I really like it for this quilt.  Gives it a whimsical look.


Close up of a couple of the daisies and the framing.


The binding was done in yellow, matching the small inner border, tying it all together quite nice.


I had several strips leftover from the petals, frames and borders, so I stitched them together for the backing.   I was still short, so I found some fabric that had all the colors in this quilt top, and stitched it to the top and bottom of the backing.  It now is a double sided quilt with a different pattern on the front and the back.  

Warmest...


Size: 56" x 56"
Fabric Lines Used:  Thimbleberries 
Colors:  Pastel blue, pink, yellow
Pattern:  Fresh As A Daisy (Thimbleberries "You're Invited" 02/07)
Designer:  Lynette Jensen
Long Arm Quilter:  Carol Nelson
Year Began: 2007

Year Completed: 2018

Tuesday, October 30, 2018

2018 Finishes - Party Pumpkins - #50

I don't celebrate Halloween, but I do like the fall decorations, and this is perfect for those who like fall and Halloween.  

This is another quilt (more like a wall hanging or a table top covering) from the "You're Invited" program club of 2006 - 2007.  This one is from June 2007.  It is another one that I did the top and left the borders, quilting, and binding for later.  That later came this year.  I am trying to take each of these programs that I signed up for and had the tops started and get them completed.  Since this was over ten years ago, and my tastes have changed, if I haven't done the top and don't like the quit, I have taken the kit apart and put the fabric in the Thimbleberries scrap bin.  I really would like to work on scrap quilts rather than a kit I no longer care about.


This quilt has appliquéd blocks at the top and bottom of the center of the quilt and a strip brick center of various fall colored prints.  The pumpkins and moon pieces are machined sewn with a blanket stitch I have on my Huskvana Quilt Designer sewing machine.  That was the only machine I owned until I got hooked on Vintage Sewing machines.  I will be blogging about them more later this year.


Again, this is more of a wall hanging / table topper as is is only 48" X 52"  


The border has a triangle flying geese as its first border, and then a matching strip border that matches the dark triangles.  


I wish I had gone with a darker backing to go with better with the front colors, but it matches the triangles from the border, so all is well.  At least the binding is dark and a matching fall color with the front fabrics.

Warmest...

Size: 48" x 52"
Fabric Lines Used:  Thimbleberries 
Colors:  Black Gold, Orange, Green
Pattern:  Party Pumpkins (Thimbleberries "You're Invited" 06/07)
Designer:  Lynette Jensen
Long Arm Quilter:  Carol Nelson
Year Began: 2007
Year Completed: 2018


Tuesday, November 25, 2014

Making Christmas Progress

I am making a little progress every day.  I am so excited because I will have it all done by the fist or second week of December.  No stress of working right up to Christmas Day.

I finished the Dallas Cowboys quilt for one of my sons:


This is a close up of the quilt with the backing and the binding all done.


Here it is folded and ready to go into the matching pillow case to be used as the wrapping paper.


I used the same "piano blocks" for the top part of the pillow case, and one of the lighter colors for the middle band.


I know it is hard to see the quilting on the back of this quilt, but if you enlarge it you can see I traced the stars on the front middle panel.    I came out really nice and I think he will really enjoy it.  The size came out to be approximately 50" X 68".  A good size for a throw quilt.

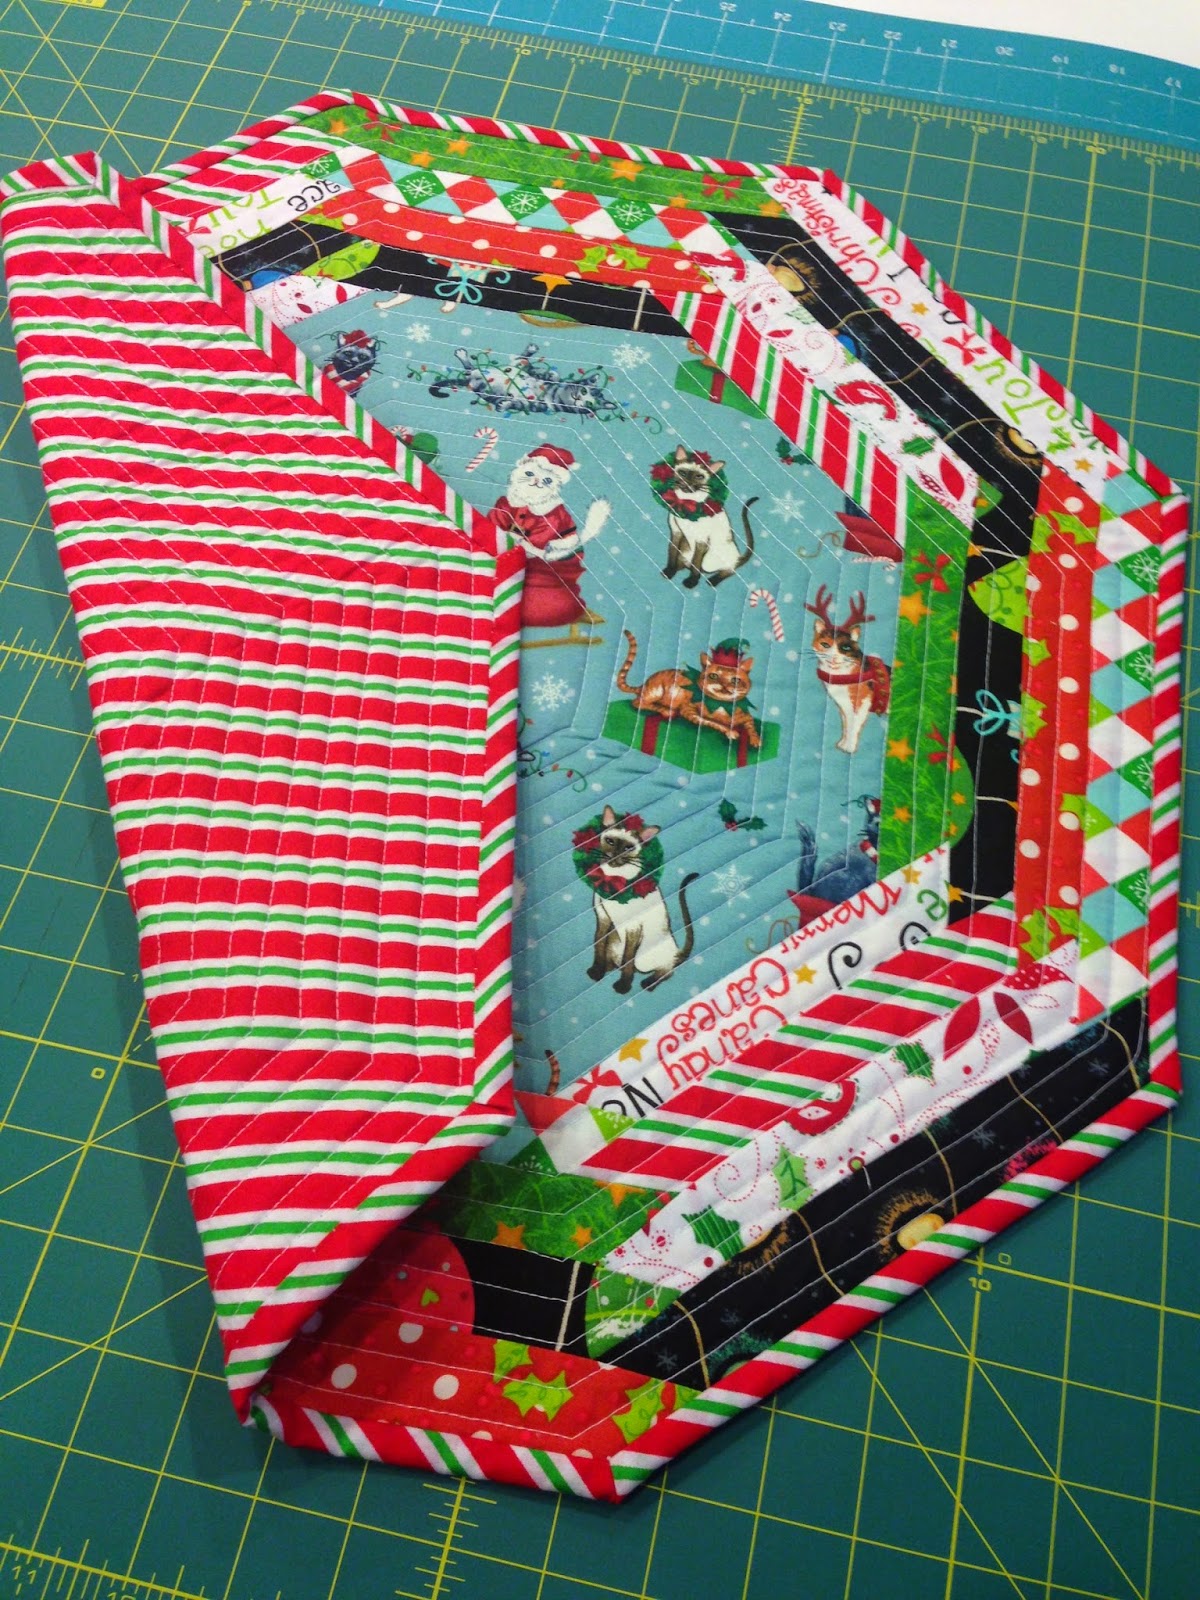
Next up is a octagon tabletopper that I made for a neighbor of mine who has a couple of cats that she adores.  The center has all kinds of cats getting into Christmas mischief.  


This picture shows the backing I used, and I also used it for the binding, as I always like to do a diagonal type binding if I can.  I quilted it doing a straight line method of outlining the octagon shape spacing the lines about 3/4" apart going around continually.


I took some time out of sewing to get some canning done.  This last summer, my chickens were giving me about 9-10 eggs a day.  Way more than we can consume.  So I stacked up about 14 dozen in our spare refrigerator, to can at a later date.  Fresh eggs need to rest for quite a while, about 6 - 8 weeks, in order for them to peel without half of the white parts staying attached to the shell.  When canning eggs, they need to be perfect without any craters or cracks in the white part.  We canned them in a red chile flake and peppercorn brine this year, giving them the red color.  The men in my life eat them like candy.  Me, no, not so much.  


Warmest...


Thursday, June 5, 2014

Yellow Instead of Blue

Yep, I ended up choosing yellow for the binding of this table topper.  The blue made it look to dark for the "summer" feel I was wanting in the one.  So, what do you think?  I did the quilting in a blue thread, though.


Chalk up another completed finish for 2014!

Warmest...

Wednesday, June 4, 2014

Strawberries and a TableTopper

I was busy all day today.  The Pacific Northwest is the berry capital of the US, and June brings the first berries ripe and ready to pick.  Yes, strawberries are coming on strong around here, and there are several "U-Pick" farms every where.  I went to one about 5 miles from my house and spent three hours picking 26 (half I picked for a neighbor) pounds of strawberries this morning.  Then I came home and put about 1/4 of them in the dehydrator, and the rest in the freezer.  Below shows the dried strawberries, as it only took about 8 hours to dry.  I have never dried strawberries before, so I only did a small batch.  But, these turned out so good tasting, and pretty that I might have to go back to the farm and pick some more early next week.

After I got all of the strawberries in the freezer and in the dehydrator, I sat down to get some sewing done.  Last fall, I made a hexagon table topper that I posted about here, and thought I would make another one for a change for my round dining room table.  This is such an easy pattern, and I had left over 1 1/2" strips from a honey bun I used in one of my Farmer's Wife  quilts I did last year.  

During the course of making the Farmer's Wife quilt out of Moda's Breath of Avaigon, I ended up getting a yard of a border print, which is a SKU in fabric line.  I really didn't need it to complete the blocks, but I knew I would have left over fabric from the blocks and figured I would be able to make something with this border bring and the scraps.

So, I fussy cut the border print for both the center of the front of the table mat and for the backing.  This way, it can be used on either side.  

This is the back of the table mat, showing a full view of the border print.


This is the front of the table matt, showing the border print in the center, and strips from the leftover HoneyBun roll sewn all around.


I have it layered and ready for quilting, which I plan on doing tomorrow afternoon.  And, I will have to pick out a binding from some of the other scraps I have in my leftover bin.  I am leaning towards a dark blue.


Warmest...

Wednesday, August 14, 2013

Hexagon Table Topper

Today, I finished the table topper I posted about yesterday.

It measures about 21" across.  I did a simple stipple quilting all over the topper because this time I used a thin scrap piece of cotton batting.


Here is a close up of a corner.  The next one I make I will be sure not to stretch the strips as I sew.  The 1 1/2" strips are a thin width, and stretch easier than the 2 1/2" strips I am used to working with.


Here is a picture, showing the nice yellow backing I used.


I think the next one will be a fall one, then a Christmas one, and then maybe a patriotic one.