Monday, June 30, 2014

Spotty Hen

I picked up this complete kit (including the batting and the backing! RARE) last summer.  I wanted to  get it for a couple of reasons.  One, I have chickens and this is most fitting, and two, it is a wool felt project, and three (I know that's more than a couple) it is small, and should be quick to accomplish.  The finished size is 13" X 15".

The pattern is by Rachel"s of Greenfield.  She has oodles of awesome projects like this one on her site.  She has a real knack of making cute things into small wall hangings and ornaments.


I worked on getting the background frame sewn together and then I cut out all the pieces, laid them out on the background, and it's ready for some hand stitching (blanket stitch).  I did machine stitched down the cream colored wool felt, because the pieces were big enough to work using the machine blanket stitch, but the other pieces are a bit too small to do on the machine, so I will do them by hand.  I am planning on working on the stitching over the next two months, as we have some trade shows all across the state and will be spending considerable amount of time in a vehicle.  


Warmest...


Sunday, June 29, 2014

Daisychain ABC's

I was looking on pinterest the other night and came across a pin of this pattern, Daisychain ABC's.  Back when I first started blogging, I found a blog, Pretty by Hand, that I was following, and the blogger did this pattern in her own colors.  You can see her version here, hers is very pretty!  I had wanted to do this sampler when it was the "popular" project everyone in blog land seemed to be doing, but I was still working outside of the home, and knew I didn't need to add another project to my ever growing to do list.  But, I now have more time, and I remembered seeing done in different colors, so I followed the link and bought the download pdf pattern.  If interested, you can go here.


I chose a almost white linen to trace the pattern on, mainly because I like white better for my background, rather than using a color like the designer did.


The embroidery colors I chose to use are the same colors that I used in the "Birdie Stitches Quilt"  (post can be found here).  This way, when I am done, I will be able to hang it on the wall in the room where the quilt will be, which will be in the spare bedroom.  A good way to tie in all different fabric, thread, and types of crafts together.


Warmest...


Friday, June 27, 2014

UFO #4 Complete

I have completed UFO #4 as of this evening.  Below is the best pictures I could get for the evening.  This first is almost the whole wall hanging in one picture.  Below that are the close ups of the different type of quilting I did on this project.  I combined both straight line quilting and some free motion quilting.

This shows some straight line quilting I did in the two inner borders, and then some free motion meandering quilting on the outer border.


In the white space around the trees, I used a loop d' loop meandering.  and if you look real close, I did some free hand stars in the blue above the snowmen.


This picture shows the inner shadowing quilting I did on the trees.


I did some intense straight line quilting (every 1/4") around the stars.  The the center star section, I quilted from side to side, and the two outside star sections, I quilted top to bottom.  Gave it some visual context.


I am delighted to have another UFO project completed, quilted and binding.  I am planning to get some more finished tops quilted this summer.  It is a goal,  something I will work hard on.  


Warmest...


Tuesday, June 24, 2014

Quilting progress

Today was another busy day, finishing up the berries, because once they are frozen from being spread out on cookie sheets, I then had to get them all put into quart bags for use throught the year. I also had to do some paperwork (like inventory) before this weekend's trade show for my Husband's business.

After all this, I was able to work on the quilting on the UFO #4 project.  I know I've said this before, but quilting the quilt takes forever, or at least it feels that way.

This is a glimpse of the top of the wall hanging, where I am doing some intense straight line quilting around the stars only on the blue background.


Here, I did some internal shadow quilting on the tree design portion of the wallhanging.  I am pondering on what more quilting I can do within the trees.  Pondering requires sleep.


Warmest...

Monday, June 23, 2014

More Berries...

It is berry season up here in the great Northwest.  Today I picked up a full crate of blackberries and raspberries, and two crates of strawberries.  All of the berries, with the exception of 6 pints, are going into the freezer as whole fruit.  The six pints of strawberries are sliced and going into the dehydrator as of just a few moments ago.


As you can see, half of the above flat is in the dehydrator below. Smile.


While I am waiting for the fruit to get frozen enough to put into freezer bags, I am working on my UFO #4 (read more here about it if you are interested)  project by getting it quilted.  I am just doing some straight line quilting, mostly stitch in the ditch work.


Some spaces, like the center of the stars, I am quilting an "X", and will do some shadowing inside the trees, but nothing to fancy, as it is a simple kind of wall hanging that calls for some simple quilting.


 Later this evening it will be back to the berry harvest as I will be picking blueberries then freezing and drying them tomorrow morning.

Warmest...

Saturday, June 21, 2014

Upgrade and Improvement

Awhile back I made myself a new iPad cover, you can read about it here if interested.  I really liked the design, liked its functionality, and ease of use.  What I didn't eventually care for is the fabric selection I chose to do the cover in, as it had a dingy look to it.  But, I went ahead and used the fabric because my husband picked it out while we were out shopping one day.  I wanted something more feminine and pretty.  This February, while traveling along the Oregon coast on a quilt run, I found this fabric that I just love.    It is the top piece in the picture below called Inspirations by Yuwa.  I think it is pretty and feminine.


In using the original cover for over half of a year, I wanted to make some changes and additions to a new one, if I ever got around to making one again.  These are the things I wanted to add or change:

1.  Include a clear plastic cover to protect the light pretty color from getting dirty and keep the fabric from wearing out faster, especially at the corners.

2.  I wanted to add a zipper to the bottom pocket to hold non-paper items, particularly my charging cord.

3.  Make a  middle cloth divider that would protect the screen from pens and zipper.

4.  Provide a pen/pencil holder

5.  Have more pockets on the left side.

6.  Include a couple of business card/credit card pocket holders.

7.  Handle on the spine for easier carrying and holding of the cover.

I am not much of a designer, so I had to give this some deep thought, forming the steps of changes in each step of the original pattern.  I took the original pattern, and would try to envision where I would need to add the steps of the new additions or changes I wanted to make, and made pencil notes where I thought they should happen along the way of making the cover.   Want to let you know right now, my envisioning didn't go very well, especially if any math was involved.  Sigh!

So, I finally bit the bullet, got all the original pieces and additional pieces cut out, and started to put it together.  Another one of my character flaws, is I always get ahead of myself, and speed ahead to future steps without thinking of what I should have done or taking a minute to think about what I might have missed.  Thank goodness for a seam ripper and by razor blade, because I had to take out a few seams and apart a few pieces to go back and do a missed step, or a total re-do because I didn't envision it just right.

Here is the first picture I took (see there's that character flaw) when I remembered to get out my phone to finally get a picture.  My actual thought was, "Oh, maybe I should be taking some pictures of me actually working on this, so my readers will believe I really made it!!"  Silly me.  It shows the different sections getting ready to be sewn all together for the final outcome.


Here are the pictures of the final iPad feminine pretty cover (Note: there are a lot of pictures):


This first picture is the front closed view.  If you look close, you will see, I used some crochet edging.  It came off os a simple vintage linen table runner.  I loved the edging and the color of pink.  It was a good fit with the fabric.  I stitched bits and pieces over some of the printed lace on this piece of fabric, and I made it into the velcro closure tab. 

1.  Plastic Cover

This shows the velcro closure.


Upon opening the holder, the left side holds the pockets and card holders.  I put some vintage lace I had on hand edging the top of the pockets.  There are actually five pockets, one zippered pocket, and one business card / credit card holder on this side.  Please note, that I had to do some hand stitching at the bottom, were all the pockets are laying on top of each other, and the layers were too thick to go through the sewing machine.

2. Zippered Pocket
5. Additional Pockets
6.  Business Card / Credit Card Holder


As the holder is open with the pockets exposed, I sewed in a cloth, quilted divider that will act as a screen protector.  I sewed a pen/pencil holder on this divider.

3.  Middle Divider
4  Pen / Pencil Holder


Now, when you flip over the divider, you see where the iPad is housed.  I used the four corners from the vintage linen table runner as the holders for the iPad.  Note they look better once the iPad is fitted in the four corner pockets.


See, here is the iPad loaded.


This shows my charging cords going into the zippered pocket.


And, this is a close up of the business card/credit card holder at the bottom of the pocket section.  I store my screen cleaner in one of these pockets.


So, there you have it, a new pretty feminine iPad holder.  I succeeded to get all the additions / changes incorporated into this new holder, with the exception of a handle.  I just couldn't get that one addition calculated into the cover.  Maybe if I do some envisioning and pondering, I can work it into the next one I do.  Doubtful, but worth the time to think about doing it.

Warmest...

Thursday, June 19, 2014

More Time Spent Gardening than Sewing

It is early summer and time for harvesting crops that are ripening this time of year.  I already posted about the strawberries a couple of weeks ago, since then I have been harvesting the following:

First off, the cherries were ready and I was picking them the latter part of last week.  This bucket was filled twice, about 5 gallons of bing cherries.  We have a 100 year old cherry tree that is grafted with three types of cherries, bing, Queen Ann, and Ranier.  The bings were the only ones ready last week, and the others are coming ripe this week.  I pitted the five gallons and put them in the dehydrator and got an end result of 2 quarts dried.


This is one of two containers of peas that were harvested the next day.  They got shelled and the pods fed to the chickens, and the peas were blanched and put in the freezer.  This year we harvested about 4 1/2 quarts of frozen peas.  Should be enough to last well into the winter, to about the time to plant again next February.


This is the spring harvest of carrots.  Not as much result as was planted.  I tried a new seed company, and not sure if it is the type of carrot, or just the conditions this year.  I will be going back to my favorite type of seed next year.  I have already planted the fall harvest of carrots, so I am hoping I will get better results.  


And, as of yesterday, the blueberries are coming on strong.  I ended up picking about a quarter of this bucket, blanching them and putting them into the dehydrator.  Fortunately the blueberries do not ripen all at once.  They will need to be picked about every 4 to 5 days for the next three to four weeks.  Last year, we picked about 5 gallons all together.  Some were given away, some were frozen, some were dried, and the rest were eaten fresh and baked into muffins, pies, and bread.


Also, not pictured, were lettuce, radishes, cauliflower, and cabbage that have been harvested and already dated and so enjoyed this year.  I get so busy harvesting and prepping the food, that I forget to take pictures.  Gardening along with sewing is great satisfaction to me and provides a wonderful end result.

Warmest...

Wednesday, June 18, 2014

Fabric Hoarder

Are you one of these:


When I look around online at different quilter sites, I see glimpses of their fabric stashes.  This is especially true when they go about reorganizing their work spaces or entire sewing rooms.  After all it is spring time, and we all get the "Spring Cleaning Bug" and I especially have this bug this year when it comes to my sewing room (and other places I have fabric and accessories stored.

Here is a glimpse into my fabric hoarding stashing:

This set of cubbies are all along a 14' wall in my sewing room.  And, yes, each of those cubby boxes, white and pink, are full of fabric.  There is even more to the left, it just didn't fit into the whole picture.  The small cubby to the far left is just wool though, and not quilting fabric.  Just sayin'.


This is a peek at the bins in my closet behind the recliner.  The recliner is for my husband, as he comes in every night and sits with me as I sew.  Priceless.


This is my wicker shelf tower, that I got last summer, and it is full of ongoing projects and some of my most favorite fabrics.  the pieces hanging on the left of the tower is all the blocks to the project I have posted about for A Civil War Tribute.  I need to get all the blocks made into the quilt top.  It is on my to do list.  Sigh.


This area is a mess, and has a pile of "bag lining" fabric, that hasn't found a home yet on the shelves.  It is waiting for a vacancy in the the cubby wall.  It is a long waiting list.


Finally, this is out in my garage along one wall.  My husband so kindly built me shelves that were specifically sized to hold plastic tubs.  Just sayin' again, the top shelf is all my wool.  And to the far right (out of the picture) is all my yarn.  This walls alone tells anyone that I have too may skills hobbies.  


So little time!


Warmest...


Monday, June 16, 2014

Purse Divider

Remember the post about material I use for pattern making, and how I was doing it to make a purse divider?  Well, I have been working on this purse divider for the last three days.  This thing has 4 zippers, and 18 pockets and stash places.  It is made in sections, and then sewn wrong sides together with bias to cover the exposed seams.  I made my own bias tape, matching it to the lining I chose to use.  All in all, it was a well written pattern, just had to make sure I read each step several times before actually doing the sewing.  I made this one at the request from my wonderful sister-in-law, and would I make one again?  Probably not.  It is a tedious project, and I don't carry a purse any more.  I use this tucked inside my bra.  


Warmest...


Sunday, June 15, 2014

Pattern Making Material


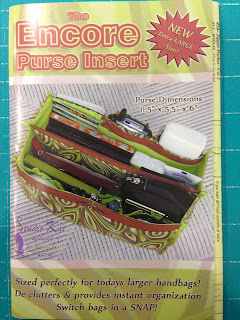
I have had this pattern for some time now, and when my sister in law asked for a purse divider insert, I knew I could use this pattern to make her one.  If you are interested in making one, here is the link to Studio Kat Designs for the Encore Purse Insert.


But the main reason for my post is to explain how I make my pattern pieces from paper patterns provided with these type of designs.


See the white roll of material standing in my corner?  It is what I use for making my patterns.  The product is called "Do-Sew" by Stretch and Sew Pattern Company.  You can still get this product from Nancy's Notions here, with the following as it's definition.  This 100% spunbonded polyester serves as both your tracing paper and your muslin. Because it is see-through and sewable, you can trace your pattern on it and sew it together to test for proper fit. and is 36" wide.


I bought a 100 yard roll about 20 years ago, when I was making lots of items from the Stretch and Sew patterns.  I'm glad I still have it, because it is perfect for tracing patterns like the pieces in this design.


There were seventeen pattern pieces in this design, and I didn't want to cut out the paper patterns included.  I like how this product is see through and can be easily pinned onto the fabric.


I know it is kinda hard to see in the picture above, but here is a close up of one piece, showing you what the material is really like.  If I had to tell you something close to this type material, think of sew-in interfacing, only thinner.


I plan on using it in place of muslin, when I do some clothing sewing later this summer.  Stay tuned...

Warmest...