Showing posts with label basket blocks. Show all posts

Friday, June 16, 2017

2016 Finished Quilts - Basket Case - #19

This is another Thimbleberries BOM Club.  Yes, I have participated in Thimbleberries clubs, programs, and kits from 2000 to 2008, eight years.  That was the period of time, I was working, making really good money (before the downturn of the economy), and buying lots of things online, while sitting in a hotel room with nothing else to do.  I also think it was a way to stay connected to my hobby, since I didn't spent much time at home.  I traveled about 320+ days a year, and I needed something to keep me grounded and attached to my quilting hobby.

Thus, this is the big quilt for the 2004 BOM Club.  It was called Basket Case, and has 12 different basket blocks to make up the quilt.  There were also 12 additional projects / kits available using one of the 12 basket blocks.  I have done a lot of those, because I could get a block done each month, and sometimes took the time to get one of the 12 additional projects done.    There are six pictures of the individual projects on my finished tab here, if you want to scroll down towards the end of the pictures.  Be gentle, this was when I was still learning to quilt, and my work is a bit wonky, especially the machine quilting I did on the projects.  

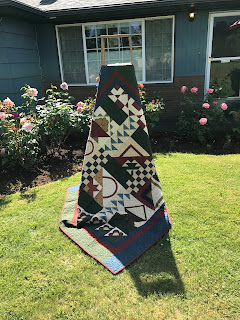
I am a sucker for basket blocks and quilts, and wanted to get this one done.  I did work on the blocks during 2004, off and on, but as my traveling escalated towards 2008, lots of projects like this were put away, not to mention, we moved five times between 2000 to 2008,  and twice since 2004.  So, it got packed away and I finally dragged it out in 2016 to finish.  I sewed the blocks together and added the border.  This is how it turned out after coming back from the long arm quilter and bound.


Looking at it all laid out flat, it is a very different completed top.  for one, the sashing is blocks of nine patch and a variation of flying geese, and some tone on tone green and red blocks.  And, if you notice the outside  top and bottom border (green) is different from the outside left and right border (blue).  Then, the top and bottom inside border is a block (red at top) and appliquéd flowers (bottom).  All around this quilt, the layout is very different from anything I have ever done. 


The following pictures are close up of the individual basket blocks.


Here is one of my most used projects from this quilt.  This is a bag made using the above quilt basket block.  This bag is 20" X 20" and holds a lot of stuff.  When I was traveling, I was able to carry hand work, my purse, and anything else, and was counted as one carry on.  It has been well used over the years, and has held up wonderfully!


More pictures of the quilt blocks in the quilt.


This is the up close picture of the top inner border.


This is an up close picture of the bottom inner border.


The backing is blue that matched one of the thin inner border fabric.  And the red binding makes this quilt pop!


Warmest...


Size: 67" X 72"
Fabric Lines Used:  Thimbleberries 
Pattern: 2004 BOM Club
Designer:  Lynette Jenson
Long Arm Quilter:  Carol Logan Nelson
Year Began: 01/2004
Year Completed: 09/2016

Tuesday, February 2, 2016

The 40's Basket Quilt

I mentioned that I had gotten back three quilts from the long arm quilter, and I needed to add binding to them.  This is the first on that I did, the 40's print of basket patterns.


I needed to chose a binding color, and came up with 30's reproduction blue and yellow.


As you can see here (work in progress of putting on the binding), I chose the yellow.  This whole quilt was bright and cheery, I went with the the color that was just that, the one that looks like the sun.


These are the only pictures I picked to use for now (the weather here in the Pacific Northwest is not working withe blog picture taking) of this quilt. 

This is a close up of one of the basket blocks showing the quilting and one of the basket patterns used in the quilt.  If you look at the top picture of the whole quilt, you'll notice that each basket block is a different pattern.

I am really happy to see that this one is done, finished, complete!  It will fit a twin size bed and will look just right someday, when I figure out how to do some displaying of them throughout the house.  


Warmest...

Wednesday, October 21, 2015

Picture Always Shows The Flaws

Can you see it?  The big blaring MISTAKE!!!  Let me tell you all about it.


This project was what was called a "counter BOM" meaning that the local quilt shop would give you a free block pattern each month if you bought the fat quarter out of the fabric line that was chosen for the  quilt.  Patterns in this quilt were 12 different basket blocks done in a 30ish to 40ish reproduction line of fabric.  Project happened from 2007 - 2008.  I sewed all 12 basket blocks and 12 nine patch blocks / setting triangles.  I had a few squares left over, so I stitched them up into a different layout of the nine patch using only four prints.

Fast forward to 2015, the year of catching up and finishing up old UFO's, and I picked up this one and put it all together.  Yippee!  Right!  

Wrong! Wrong! Wrong!  See that brown 9 patch with only 4 square of the print instead of 5 squares? Yep, that one.  I picked up one of the "leftover" blocks that I had made instead of using the correct one.  I cannot believe how blaring it is once I took the picture.  That wrong block throws off the look of the whole quilt.

I am really glad that I take pictures when the top gets done, just for this reason.  Finding this kind of blaring mistake at this point can be fixed, not so once the top is quilted.  

So, out came the seam ripper, the correct block is put in place and ta da!  We have a new and improved version:


Oh what a difference one little block can make.  I have some plain 60"wide muslin on order to use for backing, and I can mark this one off my UFO list.

On a side note, I also got started on the 2015 Leaders and Enders project from Bonnie Hunter's Quiltville site.  I have four rows of 17 pieces in each row done, and will continue to work on it until I have about 20 rows done.  About the size between a double bed size and a queen bed size.  It should go pretty fast as the blocks are around 5".  I am not doing anything special, like doing a light one then a dark one.  I am just picking up one off the top of the pile and sewing it on to the row and then picking up the next one on top of the pile.  It is proving to be interesting, but very freeing from following a pattern of contrasts.


Friday, August 9, 2013

Messed Up Bad!

Ever make a bad purchase sometime in their life?  Well, here's mine.  Yep a quilt frame that uses a home sewing machine.  Sounds perfect, especially if the budget is slim, and one cannot afford a longarm setup.  I thought this would be the next best thing, and would be better than quilting a big quilt with just the home sewing machine.

All sounded good, looked easy enough, would speed up the process, and I would be cranking out all my quilt tops faster than one could blink!  Ha! Ha!  Not so...


In doing my first quilt on this frame, I chose a BOM that came from the same local quilt shop as this post (you can read about it here) , and again the materials were not the same throught the quilt, and was something I didn't think fit in the stellar column.  Perfect for testing and practicing on the frame.  So, I made leaders, pinned the quilt to them, rolled it up on the roller bars, and started the quilting.  Yeah right!  What a disaster......argh!

1.  The thread broke a lot.  I mean a lot.  Especially if I didn't use the correct speed.  If I went too fast the stitches would be too long, and the bobbin thread would pull up to the front of the quilt, and at some point very quickly the thread would break.  If you went too slow, the bobbin thread would snarl and become a rat's nest on the back, and the thread would break.  This meant, that I had to roll the machine back to one end or the other, rethread, and reload the bobbin, and then roll it back to where I had left off.  I could only quilt a small area, and then I would have to stop and do all the steps to rethread the machine again..

2.  The stitches were uneven and jerky, which I am sure is because home machines do not have a stitch regulator, and the mechanism that operated the foot pedal was inconsistent, thus causing the unsightly stitches.  See number 1.

3.  Quilting with my home machine only let me quilt about 7 inches, which is the "depth of the machines throat" by the width of the quilt.  Then I had to stop and roll the quilt forward.

4.  I needed to have more bobbins wound, because after going one and a half widths of the quilt, the bobbin would run out.  I only had two empty bobbins to use on the project,so after three rows, I had to take apart a section of the frame to get to the machine in order to wind two bobbins.

It could also be a possibility that I might not be smart or patient enough to operate the frame! I know it was put together correctly, because hubby did that part, and he's very good and smart in thaat area (he even reads the paper directions!).

I did about a fifth of the quilt, and several days (did I say days?), yes days, I gave it up. Stopped. Quit. Done. Put it on Craigslist and couldn't get it out the door fast enough!

Here is a picture of what I considered a disaster.


Originally I was just going to throw the whole mess out, but my Husband talked me out of it.  I came across it the other day when I was reorganizing my sewing room.  I pulled it out and began taking out all that messy stitching.  Yes, I use a razor blade, rather than a seam ripper.  I had it ripped out in no time!


Here is a picture of what the top looks like, just note another row of basket blocks over the fence.


Here is a close up of the basket block. I am a big fan of basket blocks, so I think rework this one someday. It would make a great charity quilt. I think? Maybe? Sigh.....