Showing posts with label Scrappy. Show all posts

Wednesday, December 19, 2018

2018 Finishes - Zeke Scrappy - #57

I have more Thimbleberries scrap fabric than I know what to do with, especially pieces measuring 2.5 inches.  I was playing around with using up these pieces, and put together this pattern.  This is one of my first designs using no pattern other than what was in my head.  I am calling it Zeke Scrappy.  I will get to why I am calling it later in the post.  

I thought I would be able to put a dent in my scraps, but no avail.  This is one of my favorite quilts I have ever made.  One because I designed it, and two, it's scrappy with my favorite line of fabrics.  There is not much if any duplication in the pieces.  It borderlines on being a postage stamp quilt. 


The size is 65" X 88".  I made it specifically to be a throw for a tall big man.


I chose a scrappy reds for the binding, to bring all the colors of the quilt to a focal point.  


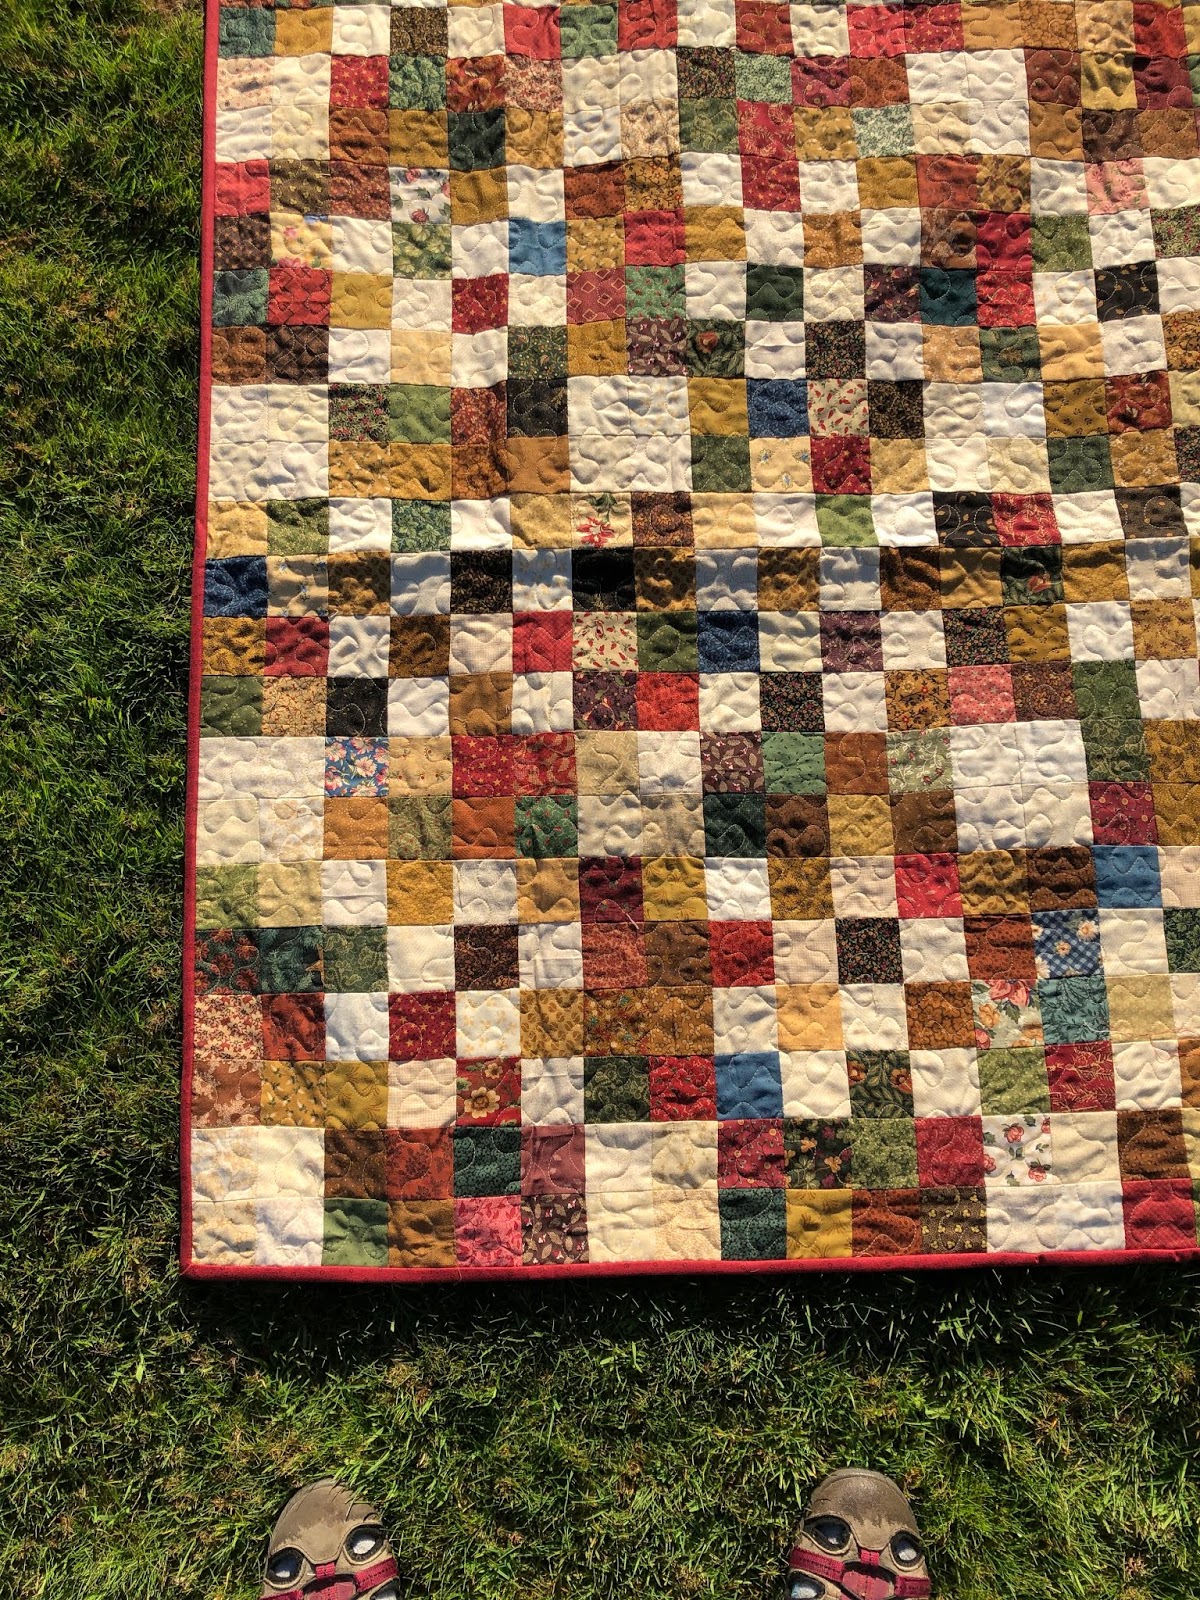
Of course, I chose my favorite 108" backing for this quilt, as it fits the colors and background of all my Thimbleberries fabrics.


Now, the idea behind this quilt comes from a person that came into our lives when my children were in high school.  His parents had just gotten divorced and he was not in a good place, so he spent a lot of time with my children and at our home.  He began to call me mom, and loved being a part of our family.  He went on to do a tour in the military, landed back in the Eastern part of the US, got married to a wonderful woman, and now has a daughter.  One of Facebook's redeeming qualities is that I can keep in contact with these individuals and their growing lives.  This individual, Zeke, commented on one of my FB quilt posts that he buy one of my quilts, as he wanted one.  I replied that I don't sell them, but that I would make him one.

When I sent it to him, I wrote him a note explaining that life gives us lots of scraps that we piece together that makes us whole and what we are today.  Much like a quilt, the fabric can stay in a box all jumbled up and messy, not really being anything useful, but put together it turns into a beautiful thing that is useful, comforting, and warm.  It brings happiness to individuals lives, much like he did in his life.

Therefore, I give you the Zeke Scrappy...

Warmest...

Renee.


Size: 65" x 88"
Fabric Lines Used:  Thimbleberries 
Colors:  Black Gold, red, Green, blue
Pattern:  Zeke Scrappy  
Designer: Renee Steele
Long Arm Quilter:  Carol Nelson
Year Began:2018
Year Completed: 2018

Friday, December 7, 2018

2018 Finishes - Hourglass & Rails - #53


Everybody who reads about my projects and quilts, know that I'm  a follower of Bonnie Hunter at her blog Quiltville.  Every year around June/July, she puts out a new Leader Ender project.  I combined two of her years blocks to make this quilt.


Year 2016 was the pinwheel block and year 2017 was the rails block.  I chose to alternate the two blocks and came up with this quilt.


This quilt is made with 30's reproductions prints, and there is not duplicate within each block.  So, in essence, there in one block in a pinwheel and one block in a rail using the same print.  But, it is really very scrappy.  It measures 84" X 102".


The sun did not do justice of this quilt.  This is a close up of a corner of the different blocks.  I get all my quilts done in a stipple pattern by my long armer quilter.  It is very reasonable, and looks great on most of my common quilts.  

I chose a very pretty pink tone on tone to match the period pink colors.  I used it also for the binding.


Size: 84" x 102"
Fabric Lines Used:  30's Reproduction Prints
Colors:  Red, Green Yellow, blue, pink
Pattern: 2016 Pinwheels and 2017 Rails Leaders Enders 
Designer:  Bonnie Hunter
Long Arm Quilter:  Carol Nelson
Year Began: 2016
Year Completed: 2018

Friday, November 23, 2018

2018 Quiltville Mystery Quilt - Good Fortune

It's that time of the year again.  I am doing the Quiltville Mystery Quilt again.  This will be my fifth year of participating.  This year Bonnie Hunter is calling it Good Fortune.  You can read about the mystery quilt and all it's instructions as they come out here.  


The mystery quilt has the premise of using fabric from your stash based on the colors she has chosen to use as a suggestion.  She always refers to her color choices using paint chips.  Using the paint chips gives you help in values.  I am choosing to use up some more of my Thimbleberries scraps and picked these to match the values on the paint chips.

The colors are published on Halloween, and the first clue comes out on Black Friday, and the final revel will be on New Year's Day.   I written before in past Mystery quilt posts about her thinking of doing this during the biggest holiday seasons.  

Many of us quilters no longer have families around to gather and celebrate, and by doing this Mystery quilt, they can get involved with a group of quilters around the world to keep their minds on something fun during what could be a hard time for them.  It gives them a place to connect and share with others.

Stay tuned for progress as I do this Mystery.

Warmest...

Renee

Monday, November 19, 2018

2018 Leader / Ender Project #53


Quiltville's Bonnie Hunter's, 2018 Leader and Ender project started back in July, 2018.  It is called Jewel Box Stars.  It has two simple blocks.  A four patch, and a half square triangle.  I chose to use up some more of my Thimbleberries scrap fabrics.  I have a large tote full of them, as you know, I have been finishing up a lot of Thimbleberries kits, BOM's, and programs from the years 2006 through 2009.  In all of these kits, BOM's, and programs, the program sponsor was always very generous with fabric, and I would have lots left over.

I didn't get too many beginning pictures, but here are the boxes of 2.5 inch squares and half square triangles.  I also chose to do my blocks based on 2.5 inch pieces for the four patch, and then the half square triangles are unfinished at 4.5 inches.


Both blocks will be 4 inches square in the quilt.  I have spent time making sure the half square triangles are trimmed at 4.5 inches, and it has helped a lot in having the blocks come together perfectly,


This is a picture of a finished four patch big block piece.  Placement of the four patch square aligns the dark on a path.  The project called for the background on the half square to be pointed out instead of the way I placed them.  I didn't like how much light background is when the blocks are all put together.


This is what the quilt will look like with the blocks put together.  It is going to be one of my favorites when it is done.


This is going to be one true Thimbleberries Scrappy quilt.


Saturday, August 11, 2018

Thimbleberries 2 1/2" Scrap Quilt

It's not a secret that I am a fan of Thimbleberries.  I like the older fabric lines, I like Lynette Jensen's pattern designs, how she is simple in putting together her patterns, and she had done more lines of fabric and patterns than most quilt designers.  She is retired now, to my knowledge there are no more fabric lines patterns being developed.  Once in a while she pops up with a special article in a quilt magazine with a pattern.   This is a spot from crafts about her:  Lynette Jensen was one of the very first designers to create a Block of the Month program for quilt retailers, and her Thimbleberries BOM ran for more than 22 years, with more than 300,000 quilters and 1,000 stores participating.

I have been on of the 300,000 quilters to participate in her BOM and other programs.  I heavily participated from 1998 through 2008.  I have several kits and programs left to do, but time now to work on them all.  

One of the benefits from participating in her BOMs and programs, is she over stated the fabric that was needed for the project.  This is because her designs are really geared for beginner quilters, and the projects had enough fabric for mistake cuttings.  Me - I have a full stash of the leftover fabrics from these projects.

This is a big tub full of big scraps, color stacked from when I did the Quiltville mystery quilt,  Grand Illusion.  Clearly, I didn't really begin to touch my scrap bucket.


But, hold on, here are some more scraps in my cube shelving, storing my smaller scraps.


So, I gave it some thought and wanted a really simple 2 1/2" square quilt.


I cut up a box of darks above.


And a box of neutrals above.

This is the finished top.  Not what I had in my mind, but I still like it, as it is really scrappy.


The circles show what I did to make this top.  The first circle from the top of the picture down is a block of 4 X 4 2 1/2" squares made into a 16 patch using alternating dark and lights.  the next circle was what I did for sashing.  I made it 2 X 4 2 1/2" squares using darks. and the last circle is the corner posts using 2 X 2 2 1/2" square making a four patch sewn with the sashing.  


The top is done as of last night, still doesn't look like I made a dent in my scraps, but I have to know I am getting them used up without having to buy any fabric.  That is my goal for a couple of years.  

The top measures 65" X 82".  Now it is off to the longarmer.


Warmest...


Tuesday, February 13, 2018

On Ringo Lake Mystery Quilt Finished!

Just a note at the beginning of this post.  I have been having trouble with Google Blogger and getting logged in, due to security updates, so it has been a bit of a struggle to get signed in to do a post.

This mystery, On Ringo Lake Mystery Quilt, has taken longer this year to finish than in year's past.

I think the most difficult part was making the sashing and putting it together on point.


Don't get me wrong, I really like how it turned out.  The colors go really well together, and makes for a soft print quilt.


My driveway is the only place that was dry enough and a large enough space to get a photo of the top.


I now have it ready for the long arm quilter.  I will post finished pictures later.  

Warmest...

Thursday, December 7, 2017

On Ringo Lake - Clue 2

I am late working on clue 2.  I have been busy with year end paperwork.  Yuck!! But very important.

I had a few minutes this evening to get a few of the units done for this clue.

This clue is making flying geese.  Lots of them.  If you are interested in finding out how many, you can go to Bonnie's site to find out more about this mystery quilt.


Now that I am done with the paperwork, I am hoping to catch up on this clue.  Plus, the next clue is tomorrow, and will need to get working on it as well next week.

I am also considering do this mystery in another color way of red, white, and blue.  I have had the fabric for some time now, and didn't have that "right" pattern that I wanted to do, so when this mystery came up with just four colors, I decided to add a touch of gold and I will have a nice quilt.  We'll know more by next week, stayed tuned.

The end of the year is approaching and as always, there are new Block of the Month, Block of the Week, Stitch Alongs, etc that start popping up all over the internet.

These are a couple of programs that I am interested in participating this coming year.  This one is by Katheryn Kerr at Green Avenue Quilts.  It is called Aves, and using blocks named after birds.  Since my first name is pronounced like the bird Wren, I was intrigued and will give it a try.  It is not a "traditional" quilt, but it has a lot of traditional blocks, done in a most interesting way.  If you are interested, you can go to her blog here to find out more information about this one and several others that she has done in the past and some that are currently going on.  


The other on is from Piecing from the Past, called Stars Over Baltimore.  I really like this site, as they offer Block of the Week programs throughout the year for free.  They are always done in civil war reproductions, which I am a big fan.  They also have a FB page that shows off the blocks and tops, which helps me see the different color ways that the blocks can be done.

This project will allow me to make blocks as well as do some appliqué.  I am finding that I need some hand work when we go out of town.  Or, I may go with Heat n Bond, and then just top stitch it down. I'll decide after I get the first pattern.


Warmest...


Thursday, September 21, 2017

2017 Finishes - Dresden Plate - #32

I have been working on this quilt since 2013.  Yep, 2013.  The top was finished back then, and I just stuck it in the "to be quilted" pile.  You can read about the progress here.

I sent this off to the long arm quilter in August, got it back at the beginning of September, and finished binding it last week.

Here it is laid out to get a full view. 


Close up of block pattern, sashings, and borders.


I didn't have enough of the pink from the front to do the back, so I had to pick one that was fairly close.  


My favorite view of quilts with my roses behind the quilt.


It landed on my mom's bed.  As soon as she saw it, she claimed it for her bed, as her favorite color is pink.

Warmest...

Size: 64" X 80"
Fabric Lines Used:  Various 30's Prints
Pattern: Dresden Plate
Designer:  QAL by Ann Sutton, Bunny Hill Designs
Long Arm Quilter:  Carol Logan
Year Began: 2013
Year Completed: 09/2017

Sunday, July 16, 2017

Working on Vintage Sampler

I have been working on the Vintage Sampler, the next is a large Feathered Star block.  Anyone who has done one of these blocks, knows it is somewhat a difficult block.  

There are 133 pieces when the block is completed.  I have to keep everything labeled, and organized, so I can't do chain piecing.  So, if you look at the back of the first picture, you will see the last few blocks of the leader and ender "bowties".  Yes!  I am at the end of this project.  The next few weeks, I will be trying to figure out how I will be putting them together.  I have enough blocks to make two over-sized twin quilts.


Here is a block as a ender of one of the sides of the star points.


Snapshot of a layout of another part of the feathered star.


Some of the finished areas of the feathered star.  Taking a couple of days working on it, a few hours at a time.


I am also working on refinishing my kitchen cabinets this summer.  I am a novice at this kind of project, so I am taking lots of time to get it right.  It will take more than the rest of the summer to get them done.

Here is the before (cabinet doors off already).


The after pictures.


One-third done, two-thirds left to go.   Then considering to do the rest of the house, as all the wood (door frames, bathrooms, window sills, and baseboards) all need to be done and updated.   


Warmest...


Friday, May 19, 2017

En Provence Mystery Quilt - 2017 Finishes #28

Yes, I finally got this quilt done!  It came back from the long arm quilter last week, and I got the binding on it within a couple of days.

This is a close up of that border that makes the points of the stars look like they are floating into the border.  Really a cool look.


I chose to do a the binding in the same print as the pink stars in the quilt.   I think it makes the quilt pop.


Again, the weather is not cooperating with me for picture taking, but here it is laid out on my CalKing sized bed.  See, I told you it was a big quilt!


This is a close up of the backing.  Remember, I found it at an obscure quilt shop, and felt it would work perfect, as the colors of this print are all in the front of the quilt.  The print is from the fabric line "Downton Abby" by Andover Fabrics.


Since this is being gifted, I had enough fabric of some of the scraps to make a couple of pillow cases. I like to make French seam pillowcases there are may free patterns out there on the web, especially on the All People Quilt site, where they are doing a 1 million pillowcase drive for different causes.  You can find out more here.


Here are the finished pair of pillowcases.  I made them for decoration to go with the quilt, and not to be actually used to sleep on, unless they choose to do so.


Warmest...


Size: 88" X 88"
Fabric Lines Used:  Scrap Stash 
Pattern: En Provence Mystery Quilt 2016
Designer:  Bonnie Hunter
Long Arm Quilter:  Carol Logan Nelson
Year Began: 11/2016
Year Completed: 04/2016


Wednesday, May 17, 2017

En Provence Mystery Quilt - Part 7


En Provence Mystery quilt of 2016, part 7, is the last part of this mystery quilt.  It included two separate blocks (several units of each) and the finishing instructions to complete the quilt.

First up are blocks that are the same block as part 6 only has different color placement.  This by the way is a Hour Glass Block, very easy to do.


The next set of blocks, in the instructions, were to be a 3 inch block of one print of yellow.  I felt that wouldn't be scrappy enough, so I decided to cut it into 4 equal pieces to make up the 3 inch block.  

This is the some of the parts, laid out to make the main block of this quilt.  As you can see the scrappy yellow blocks look really nice with the rest of the scrappy block.  This is a really large block, bigger than 12", and there are 16 of them in this quilt.


The next few pictures were taken, as I was working on piecing the quilt blocks and the sashing blocks to complete the top.

This first picture is of Woodstock from the Peanuts cartoon.  there is only one block of him in the whole quilt.  I thought it was too cute not to get a picture of it.


This is my bucket (the plastic bins you get when you stay in the hospital) that I use to hold all the parts as I finished them, and then pull them out to make the final blocks to sew together.


Here is the pile of completed block parts along with the sashing parts ready to be sewn all together.


This is just a picture of the overflow of parts from making them each week.  I made extra of each part, because I wanted to make sure I wouldn't have any scrappy prints of the same print get sewn next to each other.


This is the start of sewing the blocks and the sashing together.  The quilt is square, with 4 blocks across and 4 blocks down with sashing blocks in-between.

\

This is the best picture I could get this winter here in the Pacific Northwest, as it has been a very wet winter.   This is the finished top.  If you look really close at the top of the quilt, you will see a white "border".  This border is made from the left over pieces from part 1, 2 and 4.
.
Part 1
Part 2


Part 4


The first round of border has the 4 patch with a part 2 and a part 4 every two blocks, and then the final outside border is a round of 4 patch blocks.  It give the illusion of the pink and purple stars floating out into the border.  Really cool.  I'll try to get a better picture of the border when I finish the quilt.


Below is a close up the of the scrappy blocks, and yes as I look at the picture, I see a misplaces piece, but I am not going to change it, as it is such a busy pattern, I don't think anyone will see it once it is quilted.   There's probably more than this misplacement, but overall the quilt looks really pretty.  The picture does not do it justice.  


As it was laying on the bed, I called in my mom and asked her if she liked the finished look.  She of course liked it a lot, but purple is a color she really likes.  I told her that even though I think it came out prettier than I expected, it is not something I would ever use in my house.  Then we discussed a very close friend of hers that absolutely loved purple, if she would like receiving the quilt.  My mom, excitedly said yes, this quilt would be perfect for her, so we decided that when it got quilted, we would ship it off to her.  A happing for everyone all around.  

Hope to have finishing pictures soon.

Warmest...