Showing posts with label Bags. Show all posts

Thursday, January 15, 2015

Runaround Bag

One of the many custom orders that I received this month, includes one of these "mini bags" that I sell on my Etsy site.  A customer saw one that I had for sale using a college team fabric, and asked if I would make one using Dallas Cowboys print.  Since I had just made a quilt for my son using Dallas Cowboys print, I had a few scraps left over that I used to make the first one.


The pattern that I use is from Lazy Girl Designs called the Runaround Bag.  Ever since I made the first bag, I have also made a "mini key fob" to go with the "mini hipster".  This is a fat quarter friendly pattern, and there is enough fabric left over to make a fob.  Perfect two mini's to go together.

I had to run to Joann's this morning for some fleece and yarn to make some team baby blankets that are also on my Etsy site.  While there, I came across a different pattern in the Dallas Cowboys, so I picked up some and made an alternative one so the customer could have a choice.  This is the one that they happened to choose.


These bags are fully lined, with a back open pocket, measures 10" X 5", zipper closure to the main body of the bag, and a strap approximately 40 inches.  I can cut and sew one, including the key fob, in less than an hour.  One of the easiest bag pattern with a zipper that I have ever done.  Actually the pattern calls for two fat quarters, but you can get two bags out of the focal print if you get a little extra of the contrasting print.  The strap is long enough to carry the bag across the body.  

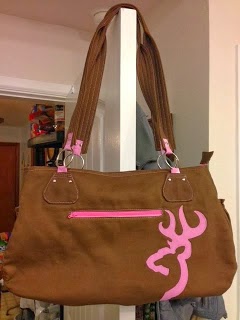
Now onto the next custom order.  This one is a bag/purse I have already done, you can read all about it here.  I sold it shortly after putting it on my Etsy site, and apparently someone found it on Pinterest, and wants one exactly like it.  This is a labor extensive bag to make, so it will take more than a few days to get done.    I call it the "Browning Bag".


Warmest...


Monday, June 16, 2014

Purse Divider

Remember the post about material I use for pattern making, and how I was doing it to make a purse divider?  Well, I have been working on this purse divider for the last three days.  This thing has 4 zippers, and 18 pockets and stash places.  It is made in sections, and then sewn wrong sides together with bias to cover the exposed seams.  I made my own bias tape, matching it to the lining I chose to use.  All in all, it was a well written pattern, just had to make sure I read each step several times before actually doing the sewing.  I made this one at the request from my wonderful sister-in-law, and would I make one again?  Probably not.  It is a tedious project, and I don't carry a purse any more.  I use this tucked inside my bra.  


Warmest...


Friday, June 13, 2014

Get Carded

If you have followed my blog for a period of time, you know one of my favorite bag pattern person is Erin Erickson, Dog Under My Desk.  She has a relativity new pattern out called, Get Carded.  I was looking for a new small type wallet, and thought I would give this new pattern a try.  I have a new favorite mini wallet!

This side of the outside of the wallet has a vinyl pocket that will be holding my driver's license.


The other side of the outside has a zippered pleated pocket for a few coins, or other small things one might want to carry.


Then, when opened, it has two areas of card pockets, and one deep pocket for cash.  It has a re-enforced velcro closure.


If I make one again, I will have to work on corners more crisp.  But overall, I am happy with this new mini wallet.  

If interested, you can get this pattern here.  Her patterns are so easy to follow and she makes zipper installment a breeze!

Warmest...

P.S.  The fabric is Barefoot Roses by Tanya Whelan for Legacy Fabrics and the lining is a Moda Bella Solid.

Thursday, March 27, 2014

Lotion Bars


This idea of making lotion bars, started with seeing it on a blog somewhere a long time ago.  I even purchased the ingredients, a double broiler (purchased three states away and hand carried it home with me on the plane), and have had this task on my to do list for about two years.  It has sat on my shelf waiting for me to get the courage to actually make it, because I thought it would be a hard task to accomplish.  Boy, was that an understatement.

First, I put all the ingredients in the double broiler and proceeded to melt all of it until it was in complete liquid form.


Then I poured into the molds.  I only used three of this mold, as I had used up most of the product in the mini cupcake pan and the regular cupcake pan.  This way I had smaller disks of the lotion bars for gifts and give aways.


I was trying different sizes, and different ways of how the product would set up in the different molds.  I will not be using the paper cupcake holders next time, as too much of the product comes off on the paper and is wasted.  After the liquid hardens, the product just pops out of the molds, easy peasy.  

So then came the next dilemma, how to wrap the product for distribution.  Ahh, wax paper did the trick, with some nice little labels listing the product information.  By the way, I purchased all of the product used in the lotion bars at Bramble Berry, Soap Making Supplies.  They sell much more than soap making supplies and everything they sell is 100% natural, including the process to produce items like their shea butter.  The link to their site can be found here, and they also have a blog that gives instructions, videos, and recipes to make things like these lotion bars.


My lotion bars only contain beeswax, shea butter, avocado oil, and cherry blossom fragrance (which they provided as a free sample with my order).  The harden bar, when rubbed on the skin will soften enough from body heat, and then you just rub it in like a normal hand lotion.  Just not as messy.

The final dilemma came after one would open the bar, how to store the bar for later and ongoing use? My first thought would be just a plain old ziploc sandwich bag, or just keep rewrapping it in the wax paper, but that was not acceptable to me.  I needed to make a pretty bag to hold it in, but did not want to use fabric as it would smear and come through the fabric, making a mess.  

 I had some PUL fabric left over from a swim bag I made, and some clear plastic table cover material I had left over from this post bag, and thought it would make a pretty bag.  I also wanted to have easy in and out access, so I used a pattern called a snap bag.  This is where the bag snaps open and closed using thin metal bars at the top of the bag (actually, most snap bag makers use metal measuring tape cut up to size).  This is what the outcome is for my lotion bars:


My husband took the mini sized ones to work to give out to the girls at the front desk area, and they all really liked them, and one even ordered one of the larger round disks for her husband.  Another one wants to buy a bar, but fragrance free.  Which was going to be my next batch anyway, so I will be selling another bar next week.  I know that might sound like a small deal to those of you who sell big time in homemade items, but this was just something I wanted to do for myself and already I have sold one and have an order! This is big for me.   Yipee!

Warmest...


Friday, January 10, 2014

I Can See Clearly

I found this pattern on Craftsy.com one evening, as I was looking for a bag pattern to use up the scraps left over from the pillow cases I made as described in a couple of posts ago.  I made up three of the small bags for each of the children to match their pillow case, and they were a big hit, because they can see what is in their bag.  Sorry, no pictures of these bags, as I finished the last one the morning we were celebrating Christmas with them.  But, here is a picture of a medium one I made for me.


The measurements are approximately 20" X 20".  The pattern doesn't include instructions for the pocket, but I added one on the outside, putting a matching fabric trim on the top of the pocket.


Another thing I did different from the pattern, was use a lining in a contrasting fabric.  The pattern called for the outside fabric and iron on interfacing.  I wanted something pretty inside, so I used the interfacing and the lining on all fabric pieces, including the top portion of the bag.


I have to put a plug here for the site I get all my zippers from, Zipit. You can find them here on Etsy.  I have always had fantastic service, and the range of choices is spectacular!  And they alway add a zipper pull free with each order.  I used my free one on this bag.  


I added this button on the pocket to hide the velcro I used to keep the pocket closed!  Just another cute embellishment I put on my bag.  

I like clear tubs to store things and now I will have a clear bag to store my ongoing projects.  I am sure I will be making more of these, as they are super easy to make, take a small amount of fabric (great stash buster!), and will be used a lot in my hobby life.  

Warmest...


Saturday, November 16, 2013

Browning Bag Done

YEEEESSSSS! I am done with this labor intensive bag.  Whew.  The following are pictures of the completed bag at all angles.  For complete details about the bag, here is a link directly to the listing on Etsy here.

Front View


Back View


Top View


Inside view of the back of the bag divided pocket.


Inside view of the zippered pocket on the front side of the bag.


The pattern is called "Olivia" by Chris W. Designs.  A link to her blog can be found here.

Browning Bag Update

This is really slooooooow going. There are over 80 pieces (including interfacing) to this bag, and more hardware than I have usedbefore. It all takes time and lots of attention to details.  I am on my third afternoon / evening working on this bag.  It's not that I am not enjoying the proccess and the outcome, I just don't think I could charge enough to cover the time spent on sewing it all together  even the hardware costs add more of a cost than on some of my other bags that I sell.  Hopefully, I cand be done within the next day.

Front view


Bback view


Warmest...

Monday, November 11, 2013

Working on Something New

I am working on a new bag, that I might or might not put in my ETSY shop.  Here is a peek at the front and back of the bag.  I just got started on it, and it is going to take a long time to complete.  I'll keep you posted of progress as I go along, only because I won't have much else to blog about.

Front side


Back side


Warmest...

Sunday, September 8, 2013

Union Jack Block Sort Of....

Okay, here's the scoop.  As you know, I have an Etsy shop, and I receive lots of requests for custom orders in the bags I have listed.  This time is very unique, as I was contacted by a new customer wanting a Two Zip Hipster that reflects her Australian background, because she is originally from Australia,  and now lives in the United States.  She left the design up to me, but wanted to incorporate the Australian flag and some landmarks from her native land.  After doing some major web searching, I found this fabric with every imaginable Australian landmark one could think of, and I figured it would make an awesome lining!  Isn't it just perfect?  My customer thought so, too!


Now, I needed to incorporate the flag in the bag.  Again back to the web and googling the Australian flag and looking for a pattern.  Lo and behold there is a wonderful paper pieced pattern here.


I reduced the pattern to 90% so that it would fit the pattern piece that I want to be on the bag.

Now, let me say that I have only paper pieced once before, so I found a wonderful tutorial here on Connecting Threads website.  I watched, and I figured I had it, so I started to put the sections together. But, to no avail, I failed, and failed, and failed.  Over and over and over again.  When this happens, I walk away, and this time I slept on it.


The next morning, I realized that I needed a mirror image of the printed pattern, so I traced it on my light box backwards, and (drum roll please)  I managed to get it done!!  The way it is supposed to be done! Happy dance!!

This is the view of it sewn together with the paper still attached.


Ta Da!  Here is the final result.  I am so pleased in the way it turned out!  I should have the bag done in the next day or so, and will post the final product.  Stay tuned.....

Thursday, September 5, 2013

Duck Decoy Bags

Sometimes, because I know how to sew other things besides quilts, I get some very odd requests. Requests for things that can't be found ready made and in a store or online anywhere.  My brother and my nephew are addicted to enjoy duck hunting.  They are so intense in this duck hunting Thing, that they made their own mechanical duck decoys.  But, these "precious" mechanical decoys cannot be carried with the other plastic decoys, at least according to my brother.  He asked if I could make three separate bags for the three mechinical decoys.

I made the three bags 16" X 18" with a drawstring and a cord stopper to hold it closed.  The fabric is Denier Cordura which is a heavy ripstop, making it water proof and very durable.  And, of course, it had to be in a camo print, it's for hunting after all!


Here is a close up of the bag top.


Here is the bag drawn up.

Thursday, August 1, 2013

New notion help

So, after it's all said and done, I thought I would share a most amazing new notion that helps in bag making.  They are called Wonder Clips by Clover!  And wonder clips they are...

If anyone has ever sewn any type of bags, you know there many layers of thickness that regular straight pins are difficult to use.  Most of the time, I have gone through a whole box of pins, either having them bend out of shape, or breaking under the machine.  So to the rescue, here comes wonder clips!

They have the strength to hold the fabric in place, just like straight pins do, they don't leave pin marks, you never forget to remove them and break a sewing machine needle (only because the needle and foot can't sew over them, tee hee hee), and they don't poke your fingers.


They come in packages of 10, 20, or 50.  I started out with 10, and realized I liked them so much, I picked up a package of 50.  They even come in a nice container box to keep them in!  


Here is a close up of the little wonder.


To be totally honest, I bought the original 10 clips to use when binding my quilts, and the box was open one day, and I grabbed one to use while making a bag, and the rest is history.....


NOTE:  Clover now has jumbo wonder clips (green).  Go figure, I might have to give them a test run, too.

Monday, January 14, 2013

Waiting's Over

Well, I finally got the right sized hardware to finish the coin purse that I posted about here.  I had asked you to stay tuned, but ran into a snag when the hardware did not fit.  Well, today it arrived in the mail, and I knew I could get it done this evening.


I know the pattern called for the side gusset, but I am not a fan of it after getting the hardware sewn on, as it looks to gappy (I know.  Gappy isn't a word, but it works here).  Also, if you are actually carrying change or small things, it seems these sides would lose them?