Friday, November 30, 2018

BDU Memory Dog and Bear

We have a dear friend that served in the military and did a tour over in the Middle East.  I am taking a pile of his uniforms (BDU's) and making a memory dog and bear for his daughter.  I also will be making a quilt with the leftover pieces for our friend.


This is the dog sewn up before stuffing.


This is where he is stuffed, still unfinished.  I have to tweak the stuffing, add the eyes and sew up the back.  


Here is the finished stuffed dog.  The eyes and nose make the dog look so cute!!


This time of year is tough to find red, white and blue striped ribbon, which is what I want to use.  The recipient is a young girl, so I went with a pink bow.  


I am honored to do this for our friend.

Warmest...

Wren

Monday, November 26, 2018

2018 Finishes - Farmer's Wife #52

Going back to July 2011, another blogger started a quilt along doing the Farmer's Wife sampler quilt.  This was really popular around that time,  and several bloggers and local quilt shops were doing it either as a quilt along or a BOM.  I had already purchased the book several months earlier (you can purchase one here on Amazon, or anywhere else you want to get a copy.  The local library might have one too.  This sampler is by Laurie Aaron Hird, and has a total of 111 sampler blocks.  The book comes with an accompanying CD rom with all of the templates.  Marti Michell also has most of the templates in acrylic to use with this sampler.

In the book, the first half of the book shows a completed block along with a letter from 1920's wives that inspired each block.  The second half of the book has a page for each block, showing cutting instructions and construction diagrams.  


I jumped all in, really excited.  I printed all the templated out on card stock, cut them out, and started cutting out each block. I blogged about each block I made.  I was so into this sampler, that I opted to do it in two separate color ways.  One in civil war reproductions and the other with a fabric line called Breath of Avignon by American Jane from Moda fabrics.

I used both the acrylic templates and the card stock templates to get each block, then placing the cut pieces in an individual zip lot sandwich baggie for construction at a later date.   Little did I know, until I was in too deep of construction, that the card stock templates were copied at normal printing (which is at about 98%) instead of setting my printer to print them at 100%.   So, many of my blocks were off up to a quarter of an inch.

Some of my blocks came out 6.5 inches and some came out at 6.0 inches.  Panic time!!!  I gave it some serious thought.  One, do I trash the whole project and move on, wasting all that fabric, or two figure out how to make it all work together. 

I took option 2.  I took the framing fabric and added an additional 1/2" to the blocks that were too small, and then framed all the blocks according to the directions.  Anyone looking at it would not see the correction.  It takes only me to know what happened and the fix.  Especially after it was quilted, there is no glaring or even an easily noticeable fix to the error.

I am still working on how to fix the other color way to get that quilt done.  I am guessing this one will fall under my 2019 Finishes.  

To read about my finished quilt on the blogger who started the quilt along, please go here.


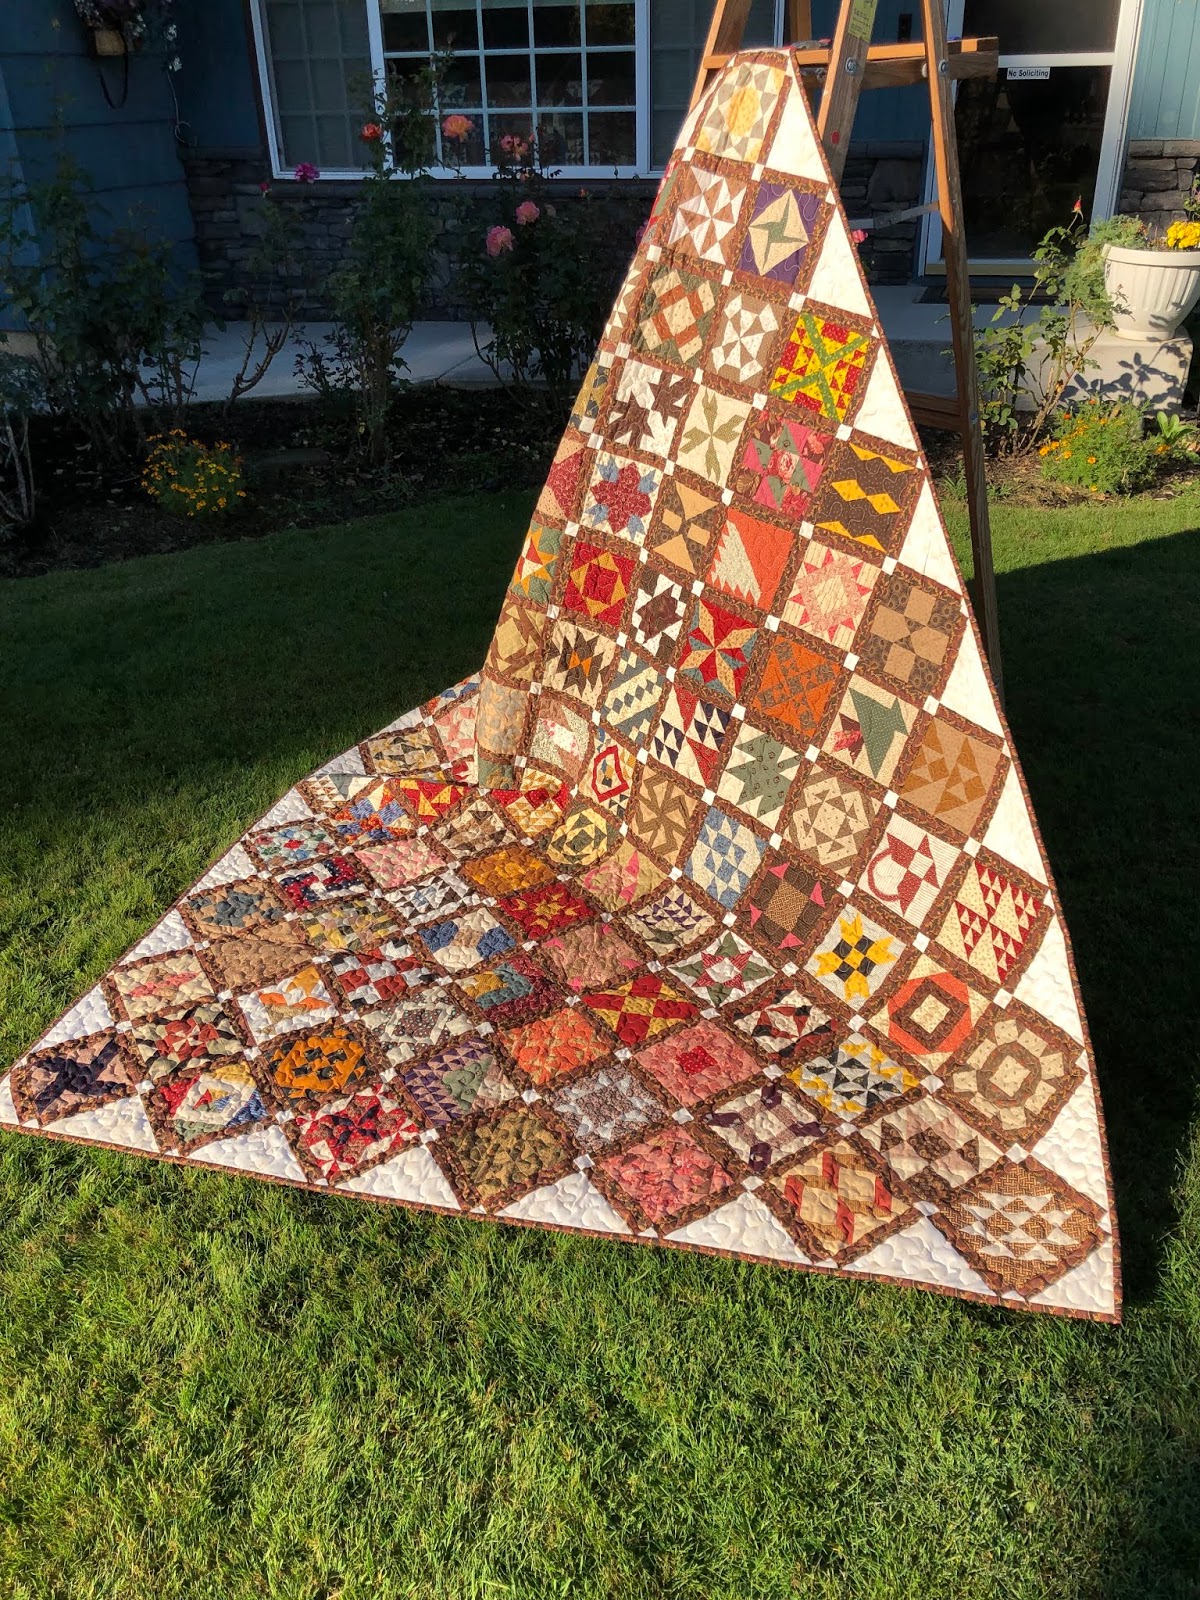
Here are some up close pictures of the different blocks and the finished framing and cornerstones, and you can't tell.  


I opted not to add any borders other than the offsetting triangles and bound it with the same fabric I used in framing the blocks.


I tried to get a picture of all the blocks used in the sampler.  Just a note about the blocks done in this sampler.  Remember they are only 6.5" square, and some of them had up to 65 pieces per block.  Sometimes it would take about 2 to 3 hours per block to make.  

This quilt requires lots of time and planning.  


Warmest...


Size: 72" x 84"
Fabric Lines Used:  Civil War Reproductions
Colors:  Black Gold, Orange, Green, red, blue, purple, yellow
Pattern:  The Farmer's Wife
Designer:  Laurie Arron Hird
Long Arm Quilter:  Carol Nelson
Year Began: 2011

Year Completed: 2018


Friday, November 23, 2018

2018 Quiltville Mystery Quilt - Good Fortune

It's that time of the year again.  I am doing the Quiltville Mystery Quilt again.  This will be my fifth year of participating.  This year Bonnie Hunter is calling it Good Fortune.  You can read about the mystery quilt and all it's instructions as they come out here.  


The mystery quilt has the premise of using fabric from your stash based on the colors she has chosen to use as a suggestion.  She always refers to her color choices using paint chips.  Using the paint chips gives you help in values.  I am choosing to use up some more of my Thimbleberries scraps and picked these to match the values on the paint chips.

The colors are published on Halloween, and the first clue comes out on Black Friday, and the final revel will be on New Year's Day.   I written before in past Mystery quilt posts about her thinking of doing this during the biggest holiday seasons.  

Many of us quilters no longer have families around to gather and celebrate, and by doing this Mystery quilt, they can get involved with a group of quilters around the world to keep their minds on something fun during what could be a hard time for them.  It gives them a place to connect and share with others.

Stay tuned for progress as I do this Mystery.

Warmest...

Renee

Thursday, November 22, 2018

Rug Hooking

I have another hobby that I don't get to very often. I even blogged about these two projects back in 2012.  You can read more about it here.  

I am on a mission to get UFO's done this year, even those that are not quilt related.  I pulled these out, and I am ready to get them bound, so they can be put in the finished column and possibly put them to use.  

This hobby is called Rug Hooking.  You can google it or look it up on Pinterest, but it is a fascinating hobby.  Basically, you cut up wool in even small 1/4" strips and hook them into a base.  The result is just beautiful.  The finished products can be from primitive to very intricate perfection.  

The top two pictures are the first one I did in a class where I was taught how to do the craft.


I folded the backing to get it ready for the binding it needs to finish it for use.


And this is the next one I did and it is ready for binding.


I choose to use rug binding (can be bought by the yard, I purchased a whole spool) to finish my quilts.  I have this one started, and I am about half way done.  

An up close look at the binding after it is sewn on around the edges.  It gives the hooked rug a nice finished look.  Then you just slip stitch the binding down around the inside of the rug.  


I usually only do my hand work while traveling to and from our trade shows.  We don't have one until the first weekend of December.  I will be able to finish this one and then work on the other one. 

I can then add all my Rug Hooking UFO's to the finished column, and then start on a new hooking project.  

Warmest...

Wren

Simple Thanksgiving

Some light humor this Thanksgiving.  We all can find something to be thankful for they year.


Warmest...

Wren


Wednesday, November 21, 2018

2018 Finishes - Sugar Pines - #51

This finish is another quilt from the Thimbleberries program called "You're Invited".  It was a kit for the month of July back in 2007.   I believe it is a table topper, but if I had given it more thought, I think it would have been a great Christmas tree skirt.


The piece measures 46" X 46", with four focus blocks that have an embroidered leafless tree in each block.  

I opted to do the embroidery on my domestic machine. using a simple zig-zag stitch.  Once it was quilted, it looked just as nice as if I had done it by hand.


This kit was done in darker Christmas colors and a border with a Christmas flower.


I the binding is done in red and the backing has all the colors of the front of the kit.


Warmest...


Size: 46" x 46"
Fabric Lines Used:  Thimbleberries 
Colors: Gold, Green, Red
Pattern:  Sugar Pines (Thimbleberries "You're Invited" 07/07)
Designer:  Lynette Jensen
Long Arm Quilter:  Carol Nelson
Year Began: 2007

Year Completed: 2018

Monday, November 19, 2018

2018 Leader / Ender Project #53


Quiltville's Bonnie Hunter's, 2018 Leader and Ender project started back in July, 2018.  It is called Jewel Box Stars.  It has two simple blocks.  A four patch, and a half square triangle.  I chose to use up some more of my Thimbleberries scrap fabrics.  I have a large tote full of them, as you know, I have been finishing up a lot of Thimbleberries kits, BOM's, and programs from the years 2006 through 2009.  In all of these kits, BOM's, and programs, the program sponsor was always very generous with fabric, and I would have lots left over.

I didn't get too many beginning pictures, but here are the boxes of 2.5 inch squares and half square triangles.  I also chose to do my blocks based on 2.5 inch pieces for the four patch, and then the half square triangles are unfinished at 4.5 inches.


Both blocks will be 4 inches square in the quilt.  I have spent time making sure the half square triangles are trimmed at 4.5 inches, and it has helped a lot in having the blocks come together perfectly,


This is a picture of a finished four patch big block piece.  Placement of the four patch square aligns the dark on a path.  The project called for the background on the half square to be pointed out instead of the way I placed them.  I didn't like how much light background is when the blocks are all put together.


This is what the quilt will look like with the blocks put together.  It is going to be one of my favorites when it is done.


This is going to be one true Thimbleberries Scrappy quilt.


Friday, November 16, 2018

2018 Finishes - Star Blossom - #49

I am working my way through the programs that I have kits from, and this is another one from the Thimbleberries program "You're Invited" for April 2007.  It is called "Star Blossom" and is a quilt / table topper.   This one would look nice on a table because of the way the five stars are laid out in the middle.


This has a fall look about it with the colors used in the top.


Just a close up of the star, and the other blocks.  I used a scrappy binding to use up the leftover fabric from the top.


I have used this backing on several of my Thimbleberries quilts, as it has the colors of most of Lynette's color palette, and it comes in a 108" width, making it an easy go to fabric for a lot of these quilt kits.  


Size: 42" x 42"
Fabric Lines Used:  Thimbleberries 
Colors:  Black Gold, red, Green
Pattern:  Star Blossom (Thimbleberries "You're Invited" 04/07)
Designer:  Lynette Jensen
Long Arm Quilter:  Carol Nelson
Year Began: 2007

Year Completed: 2018

Wednesday, November 14, 2018

2018 Finishes - Prairie Primrose - #48

This one is so different from most of my quilts, but is one of my favorites and now has a home on my bed.  This quilt is called Prairie Primrose out of a book called Simple Traditions by Kim Diehl.  The monthly program was through Homestead Hearth for twelve months, starting in December 2006.  You can read more about it here, as I was blogging when I decided to pick up this project and start working on it again.


It is a king sized over large quilt measuring at 104" X 104".  Each appliquéd block measures 20" X 20", before adding on the sashing and corner stones.   The fabric is from Kansas Troubles Bound to the Prairie II line by Moda.


I was able to get the top completed up to the outside border and setting corners.  Actually, I had already appliquéd the setting corners, but the pattern called for a vining appliqué to be done on the wide plain border.  I kept putting it off, as it would be a horrendous time consumer.  Then, I had the bright idea of just finishing with no appliqué on the border.  The borders hang off of  the bed, and it looks perfect with out the appliqué.  I am delighted that I went ahead and finished this way, as it is done and looking lovely!


The below pictures are close ups of each block, each done in a different color, causing the quilt to flow and not look flat.


The overly bright sun doesn't really show the appliqué, but I did it with a blanket stitch on my domestic machine.


I chose to do a scrappy binding, as I had lots of green left over from not choosing to do the green vine appliqué on the border.


The backing is one that has some of the colors from the front of the quilt.  I wished I had gone ahead and used a more matching Kanas Troubles fabric, but the backing rarely gets seen, so I am still happy that it is all done.


Size: 104" x 104"
Fabric Lines Used:  Kansas Troubles Bound to the Prairie II
Colors: Green, Wine, gold, blue, red
Pattern:  Prairie Primrose (Simple Traditions)
Designer: Kim Diehl
Long Arm Quilter:  Carol Nelson
Year Began: 2006

Year Completed: 2018